The time to lay the sill plates is probably the most important in housing carpentry. The more accurate you are with this step the easier it will be on everyone involved, including the trim carpenter.
I once worked on a house where the lead carpenter just went by the foundation without even measuring to make sure it was the proper dimensions until the first floor framing was nearly completed.
When the ply won't hardly fit on the first floor things are really gonna get rough by the roof! The footprint, or sill plates of the building were three inches out of square. If you have been on a job like that I feel for ya.
In carpentry if you ask five people how to do something there will be that many different answers. So I'll show you what has come to work best for me over the years. Verify that all foundation measurement's are within tolerances and that there are no high spots, before beginning installation of the sill plates.
It's been my experience that in the concrete world within an inch is close enough, you want to be better than that so you may have to cheat the plate a little. It doesn't hurt anything for the plate to hang over a little but if you leave it hang in the siding guy will be chiseling concrete.
In this example let us assume that the foundation is alright, refer to the following diagram.
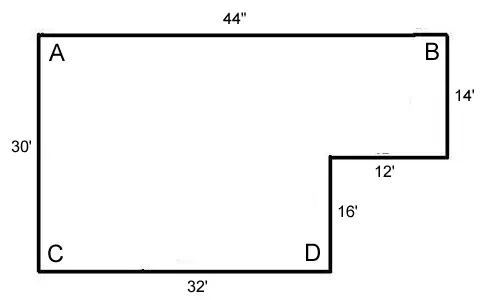
First measure in the width of your sill plates at corner A and B so you can snap a line along the longest wall we'll call it 5 1/2" for this example. Go ahead and snap the line on the 44' wall 5 1/2" in from the edge.
Next have your apprentice hold the dumb end {there is no dumb end on a tape measure} of the tape measure at double the width of the sill plates or 11"�, this I have always called burn me 1"s. If you do it like this there is no need to do the math to figure out where the inside of the plate is.
Starting at the line that was snapped near corner A burn 11"s and mark 30' near corner C then move on down and mark near corner D. Next snap the line from C to D.
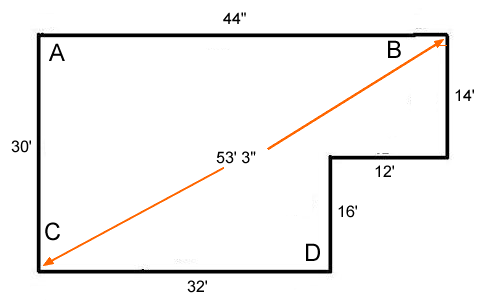
Now go back to corner A and mark 5 1/2" in towards B then burn 11"s on that mark and measure 44' towards corner B. Next burning 11"s where the 44' mark and the line intersect measure to corner C and mark 53' 3" where the C and D line intersect. Next snap the A to C line.
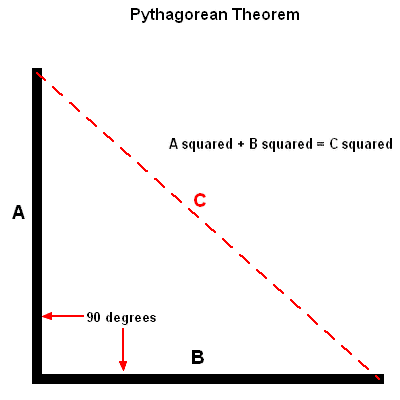
Wondering how I came up with the 53' 3" number? Pythagorean Theorem
It's easy with a construction master calculator. Here are the keystrokes 44 feet Rise 30 feet Run Diagonal 53' 3". This will work with any dimension, lets do one that everyone knows. 6 feet Rise 8 feet Run Diagonal 10'.All remaining lines can be measured off of these knowing that the 44' line is perfectly square with the 30' line.
I realize that this is a very simple example, if it could only happen this way in the real world. Of course in reality there will be walkout basements, stepped walls, and brick ledge to name a few, these problems can all be overcome with a little imagination. Use story poles, levels, masons wooden line stretchers, etc.
When laying sill plates I find it easiest to lay them up on edge and mark both sides of the bolt, then use speed square to measure how far in the center of bolt hole is off the line. Then eyeball the center of the two marks for the bolts and using speed square mark the center of bolt.
Your speed square has a tape measure on it, use it whenever possible!
Kerf bowed sill plates , so they will bend easier!
Start a nut on crooked bolts then hit nut to straighten up, so you won't mess up threads!
Put nuts on bolts only finger tight, just enough to hold plate to line, this will make it much easier to put on box sill and it will come down when you get some weight on it, you can always send the rookie down later to tighten them!
Use masons wooden line stretchers where brick ledge is, or move plate out until you can snap a line, the bricky isn't going to miss a quarter inch!
If you find yourself with no masonry nails, drill a hole thru plate and into concrete with a 3/16" masonry bit then insert 3' piece of tie wire into hole, then drive a 16 penny nail to hold plate in place!
Get to know the construction master, it will save you time, effort, and money!