Floor Framing
Approach floor framing with proper planning and care just like any other carpentry work. Study
the blueprint and make note of the location of any stairway openings,
floor joist cantilevers, in construction floor beams, and heavy loads
from above. All these conditions are important when determining floor
joist placement on sill plates and beams. Never forget,
“A Failure to Plan is a Plan to Fail”
I find it best to begin by having two carpenters
go around and snap chalk lines on the outside of the sill plates. The
same thickness as the rim joist to speed up the process of floor
framing. All floor joist ends can then be set to this line eliminating
the need to pick the rest of the floor joists up and over the rim joist.
I realize there are many carpenters
who will disagree with this method and prefer to place the rim joist
first. I have done it both ways, and feel if you only tighten sill plate
nuts finger tight this method
is best. Especially on the second floor, because you have 3 1/2″ to walk
on instead of 2″ when placing second floor joists.
Floor Framing Lay Out
Begin your floor joist lay out from the straightest and longest run the
building has. If there is enough time and can still keep all the men
busy, it’s best to layout the stairway openings first to avoid the
possibility of the apprentice carpenter locating material in the way.
This is not always possible, in that case you should start laying floor
joists on the opposite side of the stairway.
Moving Floor Joists
If you have access to a Peti bone or Lull it can be the best laborer you
ever had, even a small skid steer or backhoe with forks is much better
than your back. Framing materials can be very awkward, heavy, and
difficult to move around, especially in the mud. Since you are forced to
use what you have, at the very least have your lumber supplier dump the
load in the best location for your situation.
Locating and Rolling the Joists
Once you have the stairway and any cantilevered floor joists layed
out, begin floor framing by crowning and marking floor joists. Think about the
situation, right or left-handed person, best direction for rolling the
floor joists, etc. Locate the joists so that they are all crowned in the
same direction, close enough to the mark so all you have to do is roll
them up and nail in place.
When nailing on the end where the rim
joist goes a lot of people put to many nails on the end and split them
out, this reduces bearing on the sill plates and invites a floor squeak
which is nearly impossible to locate and fix later.
Look at the grain pattern
on the joist and locate nails accordingly, one or two well placed nails
are plenty as the joist will be nailed to the box sill later.
When working the middle I find it best to, walk the beam, nail on the
opposite side of where the opposing floor joist will be joined up.
Always work in the direction that is best for the man in the middle,
because he will be slowest, dragging an air gun, especially if forced to work backwards.
Always remember In carpentry a little planning goes a long way towards
greater efficiency, not to mention your poor aching back.
Staircase Opening
When you are framing the stairway opening and it is supposed to be
supported from below by a wall or post in the basement. There is always a way to
run a floor joist across the opening, then hang the others off that
instead of stopping to frame basement walls. You can always do basement framing after you get a roof on it.
Framing Straight Stairs
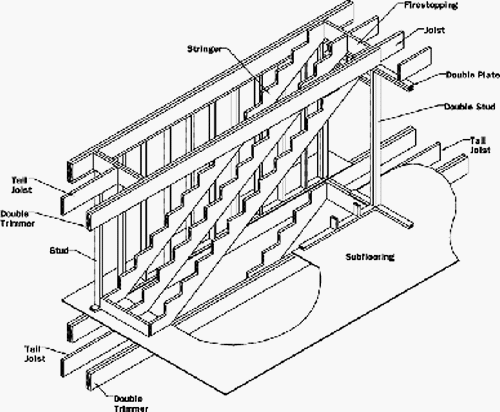
Floor Framing-Stairs with Landing

Framing Cantilevered Floor Joists
The rule of thumb for cantilevered floor joists is the 2/3 rule. At least twice the length of the joist must be inside the building as sticks out. There can be quite a bit of weight at the cantilever point, so make sure you get the studs under the joists. Another reason to build from the roof down.
When cantilevering floor joists for any reason, such as chimney chase, walkout bay window,
or brick stop. Do not try to put them exactly where the cantilever
ends. Instead let them run wild a couple of inches, measure out from the
line that was snapped for the box sill, mark and cut floor joists from
this line and it should be nice and straight.
If you use this line to measure from you can also save yourself
a little bit of math because, you will not have to deduct the thickness
of the box sill. If it is supposed to be 2′ then mark 2′ instead of 22
1/2″.
Putting on the Box Sill
After floor framing joists are in place begin putting on the box sill
by starting in the same corner that you started your layout. Some carpenters want the rim joist to break on a floor joist, however I don’t believe in this. In my opinion splicing on a floor joist is a waste of time and lumber.
This is your chance to work with your lumber salesman, use the joists
that were to crooked to use as floor joists, you can kerf them to make
the joists easier to straighten out. Below are some of the more common
ways to attach floor framing members in different situations.
Band Joist on Sill Plate
As you can see by the illustration the rim or band joist is placed flush with the outside of the sill plate.

Floor Framing on Steel Beam
The following image shows floor joists being spliced on a steel beam on the inside of a building. Notice how a sill plate is placed on top of the steel. Attaching the wooden sill to the steel can be troublesome.
I just put construction adhesive on the steel beam, place sill on top, then drive 16 penny nails into the sides of the sill and bend them over tight to the steel to hold it in place until the glue dries.

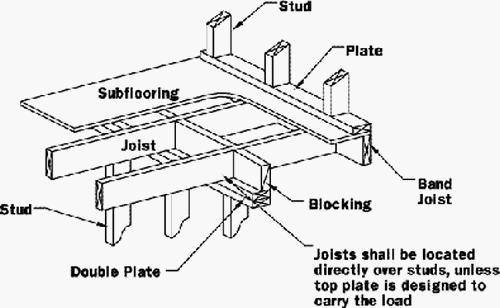
Floor Joists on Wall
Notice how the floor joists sit directly above the studs from below and the upper floors studs sit in the joists. Besides being the correct way to do it for load bearing reasons, the HVAC man, plumber, and electrician will all like it.

Floor Framing on Wooden Beam
When splicing floor framing members on a wooden beam don’t let them hang over very far. More than six inches could cause a bump in the ceiling below because of the crown.
If you have to cut them off, install them first and walk along the beam to cut the joists.

Tips for Floor Framing
Sill Plates-Tighten nuts on sill plates only finger tight, snap lines around the perimeter of sill plates.
Layout-Begin layout from longest straightest run there is, mark stairway and cantilevers first.
When floor framing – Mark and crown all joists in the same direction so you can simply roll them up and nail in place.
Links to Related Carpentry Pro Framer Pages