Basic Roof Framing Instructions
The first step in conventional roof framing
is to layout and cut a common rafter pattern. The rise and run of the
common rafter will determine the height of the ridge board as well as
the length of any hip / valley rafters that may be involved with a
conventionally framed roof. Conventional framing of roofs falls under the heading
of rough framing carpentry. Anyone who has ever tried framing a roof can tell you it is a fine tuned skill that can only be acquired with experience.
Many a carpenter has been frustrated by this seemingly dying art. Even though conventional framing
has been around for centuries, with the advent of trussed roof systems,
the demand for pro roof cutter’s has decreased. The modern day truss manufacturer can build them to match nearly any conventional roof. But not always.
New Roof Building Forum
However, if you are building an addition, garage, shed, doll house, or similar structure it is often less expensive to use conventional roof framing. You should be able to avoid problems such as, delivery costs, site space restrictions, also single framing members are lighter than a whole truss.
With this in mind I have created a tutorial to assist you with calculating common rafter length.
Free Calculator Download
 |
Get a free 30 day trial of the Construction Master calculator for your PC. Sorry MAC user’s, this is only for windows. There is also a short demo of the Calculator available, even though you won’t be able to input your own values. |
Free Trial
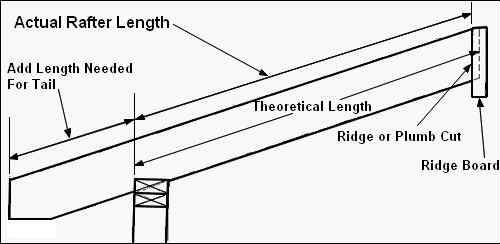
Anatomy of a Common Rafter
Below is an image of the common rafter as it is used in roof framing. If you familiarize yourself with the components that make up the rafter it should assist you in this roof framing task.

Roof Framing Scenario
In this rafter tutorial we will be using a hypothetical roof framing
situation. We will be figuring the pitch, rafter length, lumber size,
and on center spacing for the rafters. The building width is 24′ with a
6/12 pitch and a 12″ eave and 2 by 6 fascia.
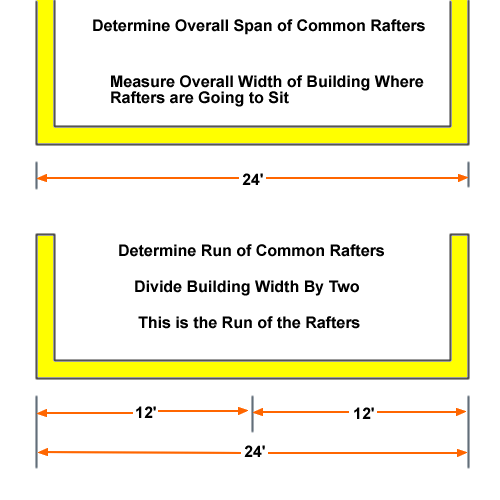
Determine Length of Common Rafter
Determine Span : This is accomplished by measuring the overall width of the building where rafters are to sit. In our case this is 24 feet
Determine Run : Divide
the span in half, in our case 24 feet divided by 2 = 12 feet run. This
is the horizontal distance the rafter travels to meet the one from the
other side.
Determine Lumber Size and O.C. Spacing : When determining lumber size to be used in roof framing keep in mind to use the horizontal run of the rafter not the length or span. I use the American Wood Council rafter span calculator. In our case the lumber will be 2 x 6 S-P-F #2 on 16″ centers.
Find Length of Common Rafter : I use a Construction Master 5 Calculator
to determine rafter length, however they cost between $50 – $100 and
would not recommend them unless you make your living cutting roofs. I
have discussed alternative methods. There is also an online rafter calculator.
The values needed to enter into the Construction Master Calculator
are Span 24 feet Pitch 6 Inch. I always take the width of the ridge
board out when figuring out my rafter length. In this case we will be
using a 2×8 ridge board. When roof framing always use the next larger size lumber than rafters for the ridge board to achieve full bearing.
Here are the sequence of key strokes for the Construction Master Calculator. 24 feet minus 1 inch 1/2 divided by 2 equals 11 feet 11 inch 1/4 Run 6 inch pitch Diag 13 feet 4 inch 3/16.
The
diagonal number is the measurement from the ridge board to the outside
edge of the wall it will sit on. After adding the length of the tail we
will need 16 foot lumber for this job. When ordering lumber do not
forget the length of the eave.
Select Rafter Stock : From the lumber pile find a straight and
light 16 foot 2×6. This will be used as a pattern once completed and
depending on how many rafters you need to cut a lighter one will be
welcomed by the end of the day. Place stock on saw horses with the crown of the lumber facing away from you.
Mark and Cut the Top Plumb Cut : To
get the proper angle for this cut place a framing square on the lumber
as shown in the thumbnail below. In this example I have doubled the 6″
pitch and 12″ run represented by the framing square. You can use 6″ on
tongue (skinny part) and 12″ on body (fatter part) and it will still be
the proper angles.
The reason I double everything on the square is to achieve longer marking areas, which comes in handy on larger rafters.

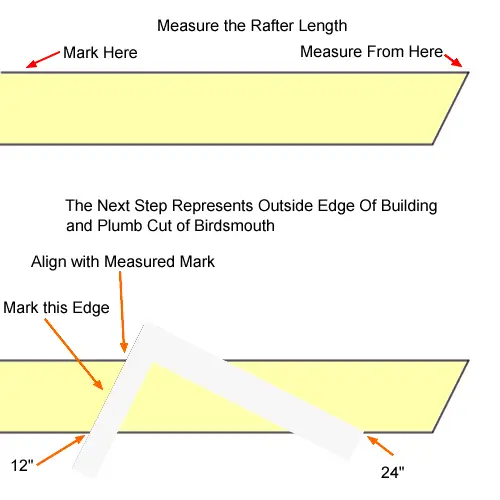
Measure Rafter Length and Mark Outside Edge of Building : Hook
your tape measure on the top edge of plumb cut and mark 13′ 4″ 3/16 on
the top edge of the rafter. Place framing square on rafter as shown
below and mark plumb line that represents outside edge of building.
Lay Out and Cut the Birdsmouth : Referring to the thumbnail
below, place the framing square on the lumber as shown and mark the
level or seat cut of the birdsmouth. This is where the common rafter
will rest on the outside wall. The length of this cut should be 4″ to
achieve full bearing. Slide the framing square up and down the rafter
until the cut is the length desired.

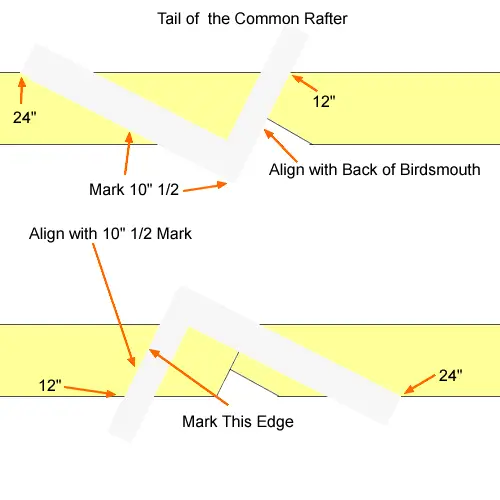
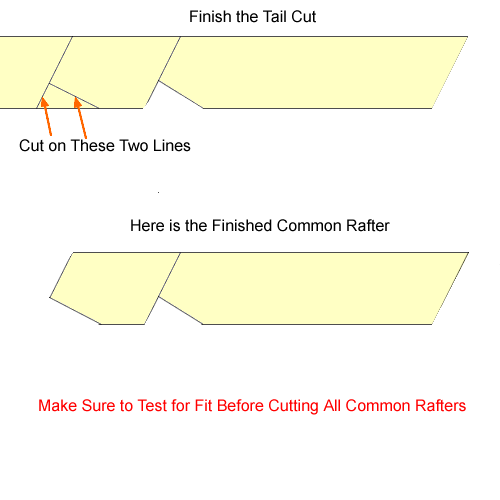
Layout and Cut the Tail of Rafter : Place framing square as shown in diagram below. Since we have a 12″ eave we want to mark 10″ 1/2 to allow for our 1″ 1/2 fascia.
Resource Material for Roof Framing
Roof Framers Bible 2nd Edition
A Roof Cutter’s Secrets to Framing the Custom Home
Links to Related Carpentry Pages