Installing Trusses on a Garage
Installing trusses is the only way to go if you are building a shed, garage, or similar small building and aren’t capable of cutting a roof.
Smaller roof trusses are in stock at most local lumber yards and big box home improvement centers. They can often be bought for around the same price as the lumber required of a conventional framed roof.
Trusses can be erected in about one third the time of a cut roof. They can be dangerous to set and shouldn’t be attempted without the proper training.
Adequate temporary bracing and safe lifting and hoisting procedures should be strictly adhered followed. Installing trusses should never be attempted during high wind conditions.
These guidelines are available at the Structural Building Components Association. I have provided a link at the bottom of this page.
The rest of this web page will be devoted to how I would install roof trusses on a 24 X 28 foot detached garage. For a 28 foot garage 24 inches on center we need 13-24 foot common trusses and two gable trusses.
Laying Out Trusses
Begin the layout from the back of the building, to keep the trusses on 24 inch centers the first layout mark is 23 and 1/4 inches. Then every 2 feet after that.
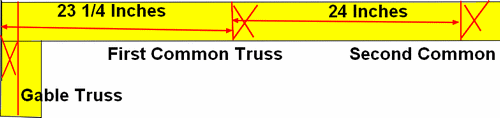
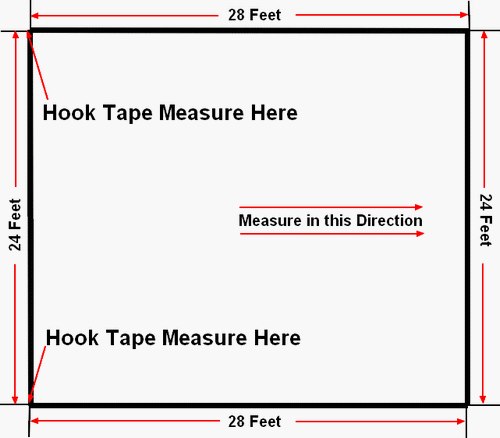
To lay this building out I just mark 3/4 of an inch shy every two feet. 23 and 1/4, 47 and 1/4, 71 and 1/4 etc.
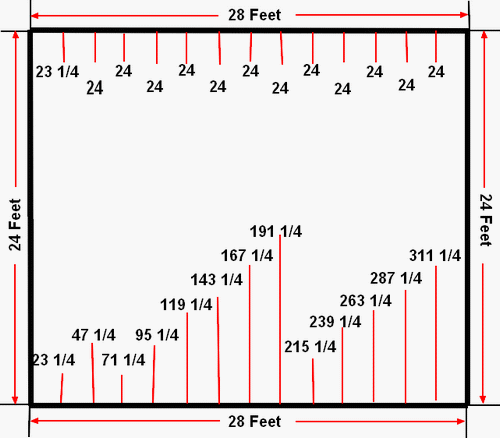
You could also make the first mark at 23 and 1/4 inches, then drive an eight penny nail to hook the tape measure on and mark every two feet after that. The two gable trusses just go flush with the outside framing of the gable end wall
Prepare to Install Trusses
Decide how you want to get the trusses on top of the walls. These trusses are fairly light and can easily be handled by two men on
the ground and two men on the wall, ladders, or scaffolding.
I like to hand them up the outside of the far gable wall and have two men on top of the walls to slide them down into position. If you aren’t comfortable walking on top of a 2X4 wall, have two men work off step ladders on the outside walls.
Carry the trusses inside the building, put one end on top of the wall and then the other. When handing trusses up inside the building its easiest to carry them upside down then use a 2X4 prop to tilt them upright.
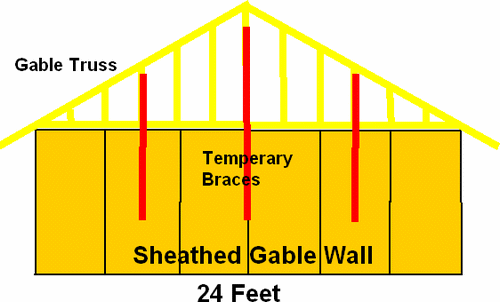
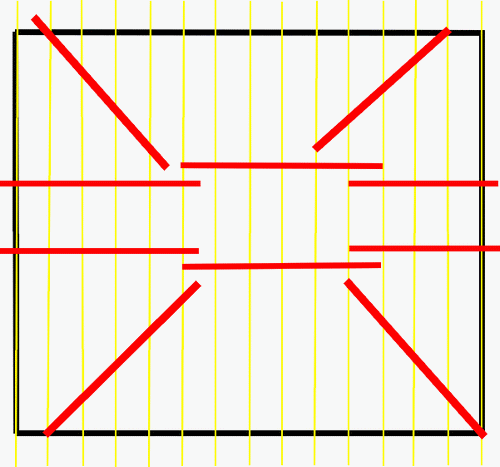
Installing Trusses-Temporary Bracing
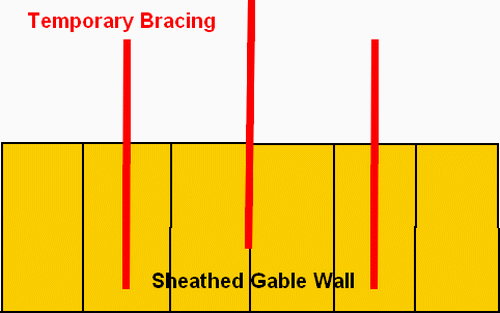
While setting trusses it is necessary to use temporary bracing to keep them in place until roof sheathing and permanent bracing can be installed.
For these small trusses we can just nail three 16 foot 2X6s flat to the gable end wall. One in the center and the other two about six feet in from the outside walls.
Just be sure to hit a stud with the nails and let the ends stick above the wall enough to reach the top chord of the trusses. It won’t matter if they stick above the roof, they can be removed as the sheathing goes up.

Installing Gable Truss
If you can the gable truss should be sheathed on the ground since it is faster in the long run. If you don’t have enough lifting help it can be done later.
This truss needs to be nailed flush framing to framing on the outside of the gable wall. It is difficult to toe nail the framing members flush so I prefer to go ahead and put the ceiling backer in now and nail thru the bottom chord into the backer.
Snap a line 1 and 1/2 inches in from framing and nail a 2X4 to the top of the gable wall allowing it to hang to the inside.
Finally its time to get on with installing trusses.
- Hoist up the gable truss and set it in place.
- Make sure the bottom chord is down all the way and the truss is centered from outside to outside wall.
- Use 16 penny nails and spike thru bottom chord into ceiling backer every 16 inches.
- If you chose not to sheath the gable you will have to put small pieces of scrap sheathing between the top chord and the temporary braces. Spike thru the temporary braces into the top chord. Remember these nails are only temporary.
Don’t worry about plumbing the gable right now, we will do that after setting a few more trusses.
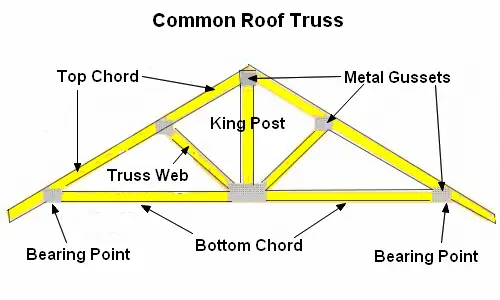
Installing Common Trusses
- Hoist up and nail into place the first common truss.
- We now need to install temporary truss bracing to the top chord of the truss.
- I prefer to use 1X4 temporary braces on these smaller trusses because you can use 8 penny nails which will be easier to pull later.
- 2X4s can also be used but 16 penny nails are harder to drive and sink, use what you have.
- Following the same layout as on the wall for the first common truss (23 and 1/4 inches) mark two short boards.
- Nail these two boards on top of the gable truss and the first common truss as high as you can comfortably reach.
- Remember these nails will come out so don’t sink them.
- Continue to use longer temporary braces as you progress.
- Set 4 more Common trusses and then you will have to install a diagonal brace inside the trusses.
Diagonal Bracing
- Before we can continue installing trusses we need to put in some diagonal bracing.
- Take a 8 foot 1 inch 2X4 and lay it out the same as the outside walls 23 1/4, 47 1/4, 71 1/4, and 95 1/4.
- Nail this 2X4 to the top of the bottom chord 1 and 1/2 inches from the center post of the trusses.
- Take an appropriate length 2X4 and nail it to the center post of the gable truss.
- Have someone plumb the gable while you nail the diagonal to the bottom chord brace.
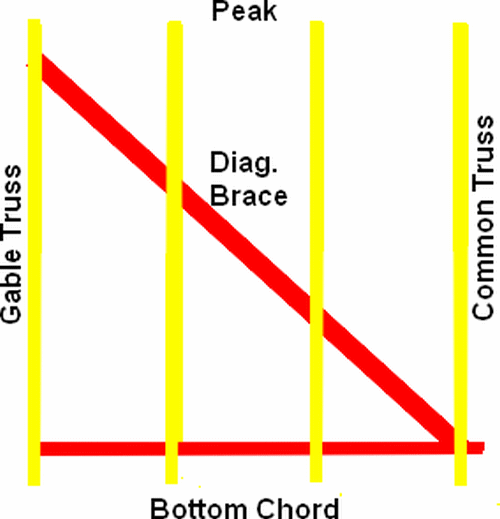
- This triangle that you have just created is a lot stronger than the temporary braces that were nailed to the gable wall in the beginning.
- You can now finish installing trusses.
- Keep an eye out and don’t let your common trusses get way out of plumb, even if you have to stop and plumb one, its better than having it leaning to much.
- When you get to the end gable truss put diagonal bracing on it just like you did on the first one.
Tips for Installing Trusses
- The tails on trusses should be trimmed to whatever eave you want before setting, in stock trusses come with a 2 foot eave.
- I don’t care how good you are, at least a couple of tails will have to be trimmed or shimmed before applying sub fascia.
- Straighten trusses out with the sheathing and only remove temporary bracing when it gets in the way of the sheathing.
- When done installing trusses they should be sheathed as soon as possible.
- If you find yourself unable to sheath right away, temporary diagonal bracing should be nailed from the heel of one truss to the horizontal temporary bracing applied earlier.
Permanent Bracing
After you are finished installing trusses permanent bracing is required. The location of bracing usually comes in a small booklet contained with your truss package.
If you need more info SBCA has a wealth of information on installing trusses and I have provided a link just below.
Links to Related Carpentry Pro Framer Pages