Squaring Walls for Sheathing
Squaring walls before standing them is a rather simple process. Whenever
possible, exterior walls should be squared up, sheathed, and house wrap
applied before being raised. Any carpenter is more efficient standing flat footed on the ground, therefore all work that can be completed on the ground should be.
We’ve all seen an 1,800 square foot ranch seem to go up quickly, heck
they stick framed all the walls in a single day. Wait a minute, where is
the second top plate, wall ties, sheathing, and house wrap? They are
actually only half done and aren’t nearly as fast as they think.
Time Lost = My Pet Peeve
Leaving off the second top plate will cost you at least twice
as much time and money. If the top plate had been applied while the wall
framing was still laying on the deck, one carpenter
could have cut and nailed it on in a matter of a few seconds. Now it
will require at least two carpenters a few hours of head scratching,
measuring, climbing ladders, and untangling air nailer hoses.
Not squaring walls will cost you even more time due to using a level to plumb up corners. Every carpenter
has been there, this way, awe too much, and oops wrong way. Not to
mention all the extra temporary sway braces that will have to be removed
later.
Leaving off the sheathing will also cost you more in the long run. What one carpenter could have done in 15 minutes on the deck will now take two men an hour. I won’t even talk about slogging around in the mud or those windy days.
Large house wrap rolls are easy to roll out flat (horizontally) on the deck just like carpeting.
Take that same roll vertically and you’ve got a whole new ball game. “I
won’t even talk about slogging around in the mud or those windy days.”
Plumb, Level, and Squaring Walls
Plumb, level, and square is one of the oldest and most basic rules of
carpentry. If the surface the wall framing rests upon is level
(horizontally) and square (mathematically) it will be plumb (vertically)
when raised.
To look at it another way, if it is plumb and square it
will be level. This basic rule has worked for centuries, even Jesus
Christ the carpenter probably used it. I would even bet that Jonathan Prine’s Grandpa of “Grandpa was a Carpenter” fame used it.
Step by Step Squaring Walls
- 1. Insure that bottom and top plates are the same length.
- 2. Place and nail bottom of wall on line, so that when raised it will be in the proper place.
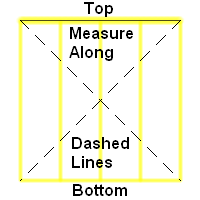
- 3.
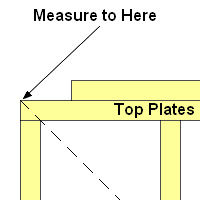
Measure diagonally from outside corner of bottom plate to outside
corner of top plate from both directions. Move top of wall back and
forth until the same measurement is obtained both ways. This may require
three or more tries to get it right.
- 4. Tack a toe nail in top plate to keep it from moving and apply wall sheathing.
|
|
|||||||||
Do You Apply Sheathing Before Standing |
|||||||||
| State/Prov* |
|
||||||||
| Which One Best Describes You | |||||||||
|
|||||||||
|
Please enter the word that you see below.
|
|||||||||
Links to Related Carpentry Pro Framer Pages
|
|
|