Common Rafters and Framing Square Basics
The framing square is one of
the most useful and versatile tools in carpentry. It can be used to
layout and cut common rafters, hip rafters, staircase stringers, these
few items are only the tip of the iceberg. Many books have been written
about the uses of the steel square.
On this web page I will discuss the most efficient ways to layout and
cut common rafters. Most roof cutters consider their square one of the more important tools they own, calling it a fine tuned instrument.
When considering the purchase of a new square, go for quality, those
$12 ones just will not cut the mustard under normal everyday use. The
square I use is a Stanley stainless steel model, which I have been using
for over 15 years, cost 30 some dollars and worth every penny.
I
will discuss three different methods of laying out common rafters with a
square. I know that there are many more ways of accomplishing this
task, I have probably used most of them at one time or another.
You can ask five different carpenters how to figure and cut rafters and get that many different answers. Whatever works best for you is the method to be used.
I like to keep an open mind about carpentry because someone will come along with a better idea.
Just to keep it simple I will use the same building dimension
in all three examples. The first method is the way I learned nearly
thirty years ago called stepping it off, time consuming and tedious but
still useful for a small dormer or shed roof.
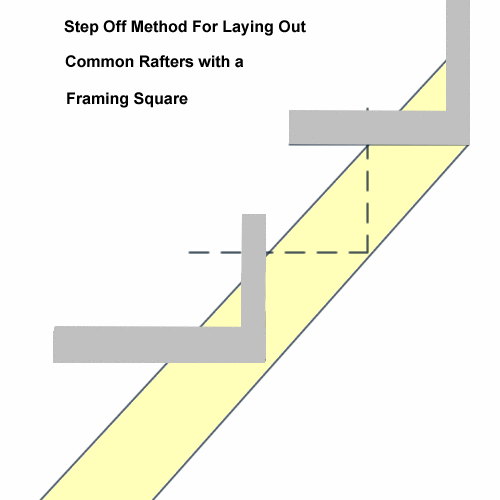
Stepping Off Common Rafters with a Framing Square
Scenario : You pull up to the job site at 6:40 AM knowing that
your first task of the day is to cut the common rafters for a 24′
garage. There is only one minor problem, your Construction Master
calculator is missing. It’s not on the dash, in the glove box,
or in your pocket. Where could you have misplaced that darn thing?
Worse yet maybe someone decided they needed it worse than you, no time
to worry about it now, people will be waiting.
You can still get the job done, maybe not as fast as with your Construction Master, however all will be well in the end.
Step 1 : Determine the span of the common rafters. Measure the overall width of the building, for this example it shall be 24 feet.
Step 2 :
Find the run of the common rafter. For a simple gable roof this is half
the overall width of the building. In this case to determine the run
divide 24′ divided by 2 = 12′.
Step 3 : Determine pitch of roof. In this example it will be a 6/12.This pitch means there will be 6 inches of rise for every 12 inches of run.
Step 4: All actions performed with the framing
square should be along the top edge of rafter so place material
accordingly. Begin by placing the square at the top edge of rafter with
the tongue (skinny part) on 6″ and the body (fat part) on 12″, draw your
plumb cut (where rafter rests against the ridge board) also mark where
body section intersects the material.
Now move the framing square
down the common rafter and line up tongue with previous body mark.
Since the run of the rafter is 12′ this action will be repeated 12
times. After you have verified repeating this step 12 times mark out
another plumb cut line on the 12th body mark. This line represents the
outside edge of the building and plumb cut of the birdsmouth.
Next,
I like to add the tail or overhang of the building. Now mark out your
seat or level cut of the birdsmouth. The last step is to take off half
the thicknessof the the ridge board, by returning to the top plumb cut
and shortening it. If you are using a 1 1/2″ thick ridge board this
would be 3/4″.
Synopsis: Determine span, determine run, determine pitch, layout rafter,cut, and test.
Framing Square with Regular Calculator
This method of laying out common rafters is much faster, more accurate, and easier than stepping them off with a framing square. This is the method I used for many years, until the Construction Master
calculator came along. The basic steps for laying out the rafter are
still the same only you do not have to step off the square a dozen
times.
Step 1 : Determine span of common rafters. 24′
Step 2 : Determine run of common rafters. 24′ divided by 2 = 12′
Step 3 : Determine length of common rafters per foot run. This can be found on the left side body of the framing
square. What you are looking for is a table on the square similar to
the one below. This is an abbreviated version of what is actually on the
square due to space restrictions on this web page.
| Pitch in Inches | 12 | 11 | 10 | 9 | 8 | 7 | 6 |
|---|---|---|---|---|---|---|---|
| Length Common Rafters Per Foot Run | 16.97 | 16.28 | 15.62 | 15 | 14.42 | 13.89 | 13.42 |
| Length Hip or Valley Rafters Per Foot Run | 20.78 | 20.22 | 19.70 | 19.21 | 18.76 | 18.36 | 18 |
| Diff Length of Jacks 16″ Centers | 22 5/8 | 21 11/16 | 20 13/16 | 20 | 19 1/4 | 18 1/2 | 17 7/8 |
| Diff Length of Jacks 24″ Centers | 33 15/16 | 32 9/16 | 31 1/4 | 30 | 28 7/8 | 27 13/16 | 26 13/16 |
Since this roof has a 6/12 pitch if you look under the number 6 on
the top row you should find the number 13.42″. The .42 portion is in
fractions of an inch and will need to be converted over to feet and
inches later.
Step 4 : Determine length of rafter. This
step is accomplished by taking the span times the length per foot run.
In this example the formula is 12 x 13.42 = 161.04″ So the length of our rafter is 161.04 inches.
Step 5 :
Convert decimal point to fraction of an inch. In this case the .04 inch
is of no importance since it is such a minute amount, after all .125 is
only 1/8″. In the real world you will seldom get this lucky so I will give you
an example of how to convert decimal points to fractions of an inch. If
you have a decimal point of .625, enter .625 into your calculator and
times it by 8 or .625 x 8 = 5 which is 5/8″ since you multiplied it by 8. If you multiply by 16 the answer would be in 16’s of an inch.
Step 6 : Layout rafter. As before begin by placing framing
square on top of rafter, tongue on 6″, body on 12″, and mark your top
plumb cut. From the top edge of this mark measure along the top edge of
rafter 161 inches (13′ 5″) and make another pencil mark. Place the framing
square on this mark as before and draw another plumb cut line. This
line represents the outside of the building, add tail cut as needed.
Next step is to mark seat cut for birdsmouth, then shorten top plumb cut
by half the thickness of ridge board.
Synopsis : Determine span, determine run, determine pitch, determine length, layout rafter, cut, and test.
Framing Square and Construction Master
This method is by far the fastest, easiest, and most accurate of
these three methods of marking and cutting common rafters. Anyone who
does this kind of carpentry work really should learn how to use a Construction Master calculator. I have been using one for over 15 years and wonder how I ever got along without it.
If you read the beginning of this page you found the reference to someone else needing it worse than me. My Carhart jacket was stolen from the local watering
hole and my calculator was in the pocket. Maybe I should have left
before the third beer, we all know how that goes. Anyway the steps are
to follow.
Step 1 : Determine overall span of rafters.
Step 2 : Determine run of rafters.
Step 3 : Determine length of rafter.
Step 4 : Layout rafter.
All
four of these steps are much easier with a construction calculator. All
you really need to know is the span and pitch to cut the common
rafters. After just a few times of doing it this way you should be
comfortable with the calculator.
Armed with the information of
12′ span and 6/12 pitch, here is how I would go about figuring the
length of the common rafter. Using a Construction Master calculator I would enter 24′ minus 1″ 1/2 divided by 2= run 11’11” 1/4 then 6″ pitch then diag. 13’4″ 3/16.
So the length of the common rafter from the outside wall to the ridge
board is 13’4″ 3/16, however there is so much more information available
just from entering the run and pitch factors.
Here are a few of the numbers the calculator stores just from these two pieces of information. Run
11’11” 1/4, Diag. (Common Rafter)13’4″ 3/16, Rise 5’11” 5/8, Hip or
Valley Rafter 17’10” 7/8, Jack 1 11’10” 1/4, Jack 2 10’4″ 3/8, and it gives you the jack rafters all the way down until 0 is reached no matter how many there are.
You still have to use the framing
square to lay out the rafter cuts, however there is no need to shorten
it up for the ridge board since I took it out in the very beginning.
Anatomy of the Framing Square
There is no other tool available today that holds the answers to
common roof framing problems than the framing square. It would be
useless for me to go on and on about the many virtues of the steel
square. I will only talk to you about the little numbers on the framing
square that you will need for conventional roof framing. Many of the
solutions and numbers are outdated and seldom used by modern carpenters.
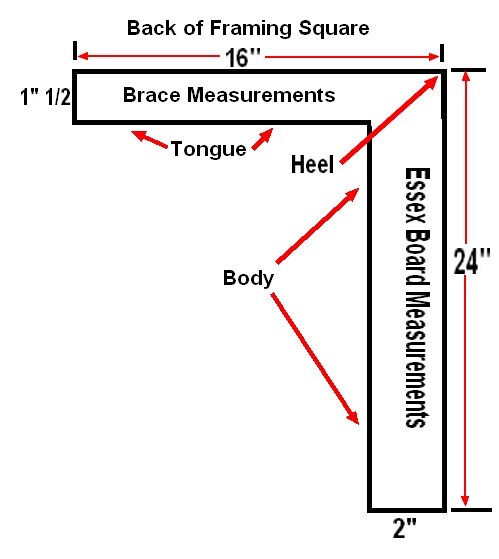
There are two main parts to the square, the body and the
tongue. The body is the 2″ wide 2′ long blade on the square. The body
is normally used to mark the level or horizontal cuts on the rafter.
The tongue is the 1″ 1/2 wide 16″ long blade that is normally used to
mark the plumb or vertical cuts on rafters.
The body and tongue
intersect at the heel on the outside edge of the square. There is also
front and back to the square which I could write a whole chapter and
probably only confuse you and myself. For this reason I have included
two images to better explain the front and back.

Rafter Tables
The most important set of numbers on the framing square are the
rafter tables. These are located on the face side of the body. The first
four rows of numbers are the most important and the only ones I will
cover here.
Length of common rafters per foot run. This
row represents how long a common rafter is per foot of run. To find the
number needed look under the number of the pitch of the roof you are
working on. For example if you look under the 6″ mark on the outside
edge of the body you should find 13.42. If you look under the 9″ mark =
15.
Length of hip or valley per foot run. This
row represents the length of a hip or valley rafter per foot run. As
before if you look under the number 6″ you should find 18, or the number
9″ = 19.21.
Difference in length of jacks at 16″ and 24″ centers. There
is actually one row each for 16 and 24″ centers. These two rows
represent how much longer or shorter the next jack rafter is than the
previous one. In other words if you need one longer, add the number from
the column to get the next one. If you are working your way downhill
subtract the number. As before if you look under the 6″ mark for 16″
centers you should find 17″ 7/8. Under 6″ mark for 24″ centers = 26″
13/16.
Brace Measurement Table
You might find the brace measurement tool handy if you build decks or
need a permanent, good looking brace for any reason. If you look
closely at the tongue on the back side of the framing square you will
see two small numbers stacked one on top of the other with a larger
single number just to the right of this smaller set of numbers.
The first set of numbers is 24 stacked on each other followed closely by
the number 33.94 inches. In other words if you need a brace for a porch
or deck set at a 45 degree angle, measure 2 feet away from the post and
2 feet down the post and the length of your brace should be 33.94
inches.
Tips for the Framing Square
Always use outside edge of framing square when possible to avoid confusion.
Get a good framing square, the Wal-Mart cheapie will not do the job.
Use stair buttons to speed up the framing square step off method and reduce the chance of mistakes.
Use the two foot step off technique if possible. To
accomplish this task, just double all measurements on the framing
square. For a 6/12 pitch hold the tongue on 12 inches and the body on 24
inches.

Links to Related Carpentry Pro Framer Pages