

The first cantilevered bump-out I framed in the Pacific Northwest looked simple on paper: push a breakfast nook out 18 inches, keep the foundation untouched, call it a win. Then we opened the floor and saw the real story: notched joists from an old plumbing run, a rim board that was more splinters than structure, and a load path that basically ended at wishful thinking. Cantilevers are absolutely buildable, but they do not forgive sloppy assumptions.
This guide walks you through the structural limits and the practical framing details that keep a cantilevered floor extension stiff, quiet, and inspection-ready. I will stay in my lane as a framer: real-world ratios, connection details, and the moments when you stop and get an engineer involved.
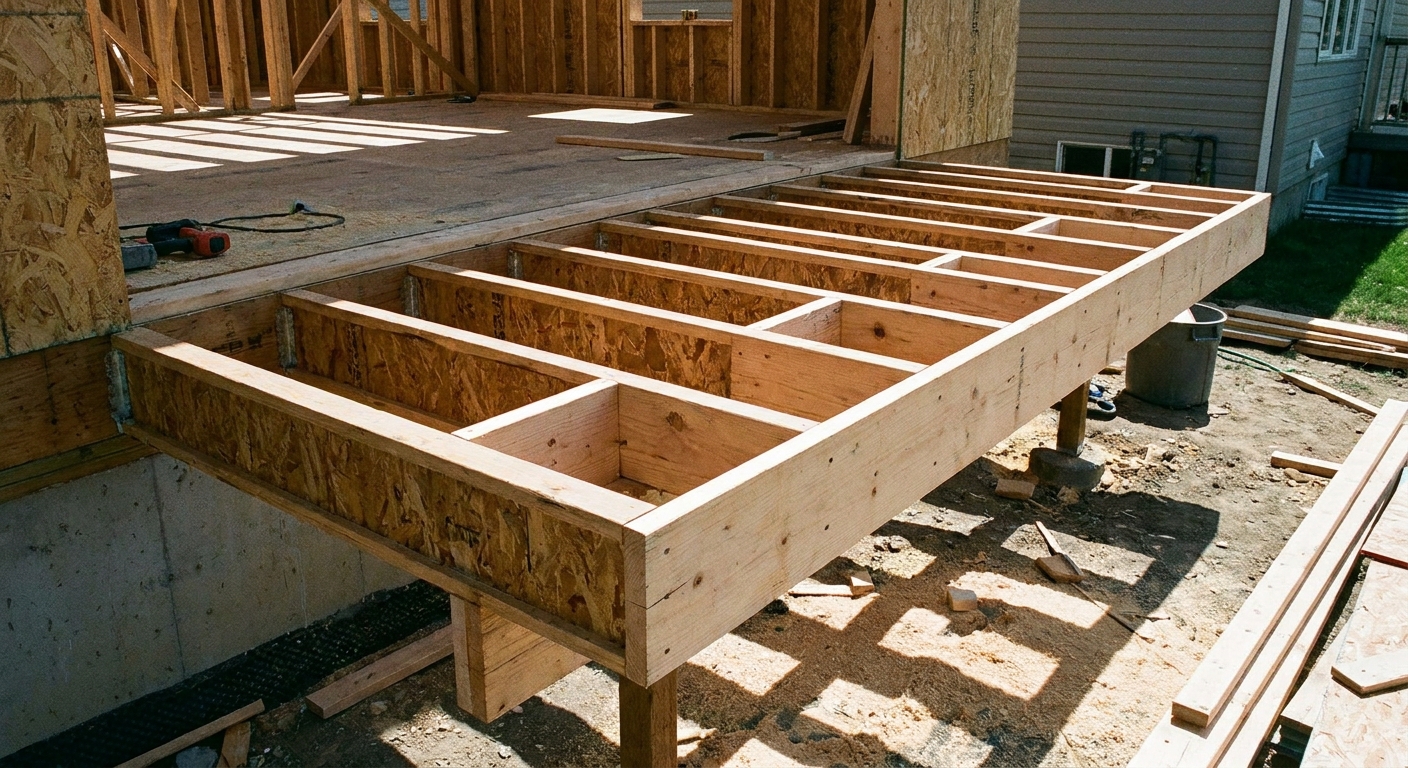
What a floor cantilever is
A cantilevered bump-out is a section of floor where the joists extend past a supporting wall or beam, creating an overhang. The overhang carries exterior wall load, floor load, and sometimes roof load if the bump-out supports a wall above.
Structurally, the cantilever works because the joist has a backspan that stays inside the building. That inside portion provides the counter-bending that balances the overhang. No backspan, no real cantilever. Just a lever trying to pry your wall down.
Two terms to keep straight
- Cantilever length: how far the joist extends past the support line (usually the exterior wall).
- Backspan: the joist length inside the building from the same support line to the next support (beam, bearing wall, or ledger condition).
Limits and ratios
If you only remember one rule, make it this: cantilevers are ratio-driven. The joist size matters, species matters, spacing matters, and load matters. But on a jobsite, you need a first-pass check before you start moving walls.
Rule of thumb: keep it to backspan/4
A common prescriptive gut-check for typical residential floor loads with typical sawn-lumber joists is:
- Maximum cantilever ≈ backspan / 4
Example: If you have 8 feet of backspan to the next support, the bump-out should be about 2 feet max.
That is not a universal law, and it is not a substitute for span tables or engineering. Different jurisdictions, load assumptions (snow, tile, tubs), joist spacing, and whether the cantilever carries an exterior wall or roof can shift what is allowed.
Long cantilevers get touchy fast
Even when the math works, longer cantilevers tend to:
- Feel bouncy at the outside edge
- Telegraph drywall cracks at corners above
- Squeak if blocking and subfloor fastening are not dialed in
- Get complicated fast if you are dealing with I-joists versus dimensional lumber
When I stop and call an engineer
Bring in an engineer or follow a stamped detail when any of these are true:
- The bump-out supports a second-story wall, a point load, or a roof bearing condition
- You are altering or cutting existing joists in a remodel
- Joists are engineered (I-joists, trusses) and the manufacturer detail is not crystal clear
- You are pushing ratio limits, chasing a long overhang, or you do not have much backspan to work with
- The project is in a high snow load, high seismic, or high wind condition and your plans do not spell out the cantilever
As a personal red flag on remodels, once a cantilever starts getting beyond about 24 inches, I slow down. That is not a magic code line. It is just where small mistakes start feeling big, and where plan review or engineering often enters the conversation.
Start with the load path
A cantilevered bump-out is not just a framing trick. It is a load path problem. Before you extend anything, answer this:
- Where do the loads land? Exterior wall on the cantilever goes into joists.
- Where do the joists deliver those loads? Into the bearing wall or beam at the support line, then to posts, then to foundation.
- Is anything discontinuous? A dropped beam, a big stair opening, or a girder that is not under the backspan can ruin the whole concept.
In remodels, I like to treat the existing structure like an unknown species of wood until proven otherwise. Verify joist direction, spacing, grade stamps when possible, and the location of the next real support. If you are reframing inside walls to create that next support, you are in load-bearing territory. This pairs well with getting your planning and sequence right, including a solid cut list before you start buying materials: Make a Cut List Before Buying Wood.
Joist sizing basics
Joist sizing is not just about whether the cantilever stays up. It is about whether it stays stiff.
What drives the decision
- Species and grade: DF-L #2 behaves differently than SPF #2. Do not mix assumptions.
- Joist depth: deeper joists resist bending better, which helps both strength and bounce.
- Joist spacing: 12 inch, 16 inch, 19.2 inch, and 24 inch spacing all change the game.
- Loads: tile, stone, a big bathtub, or a wall above will raise the stakes.
- Backspan support condition: a continuous span over multiple supports behaves differently than a simple span.
Dimensional lumber vs engineered joists
With dimensional lumber, you can often rely on prescriptive code tables and conservative ratios. With engineered I-joists, follow the manufacturer. I-joists do not tolerate improvisation. If your bump-out involves engineered joists, review the basics here first: Dimensional Lumber vs Engineered I-Joists for Floor Framing.
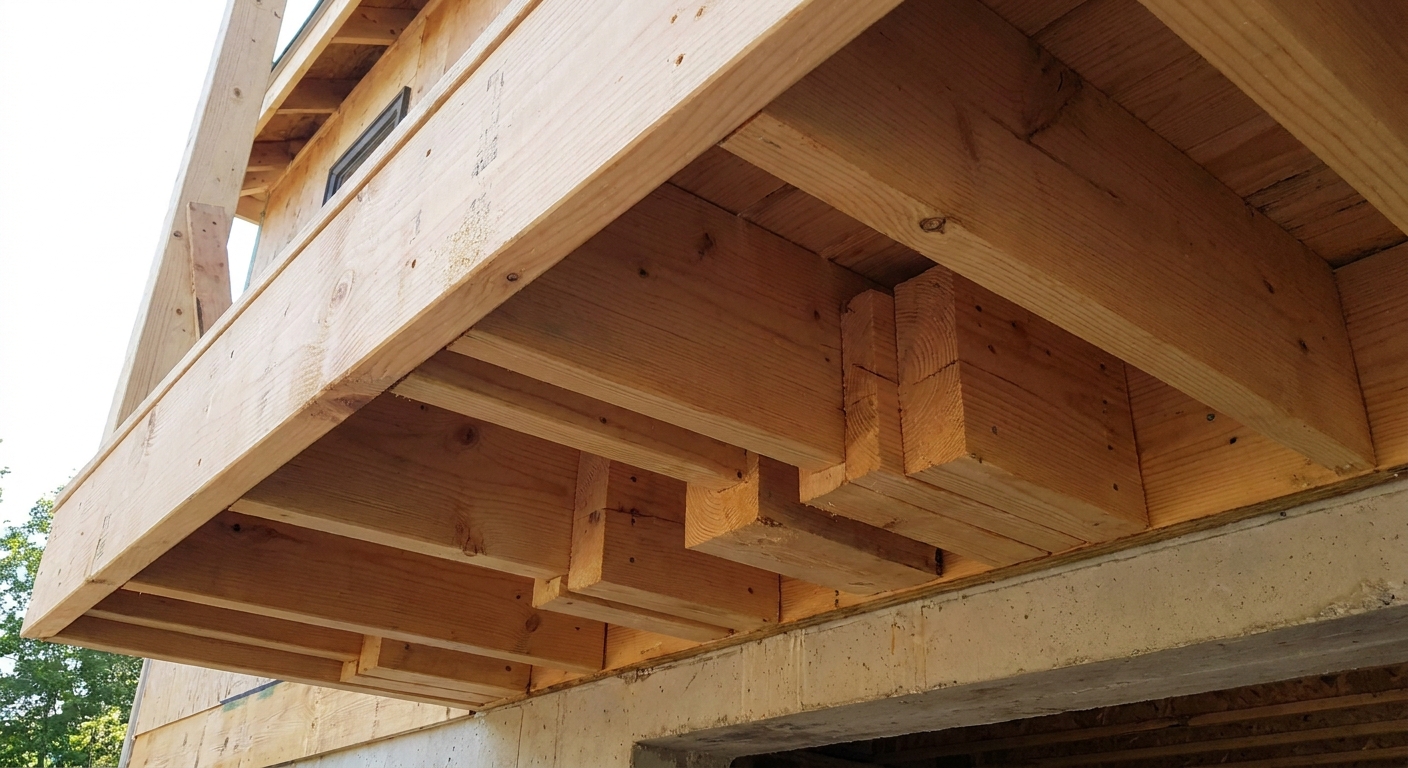
Common layouts and variations
The cleanest cantilever is simple: continuous joists that run from inside the house, across the support line, and out to the bump-out edge.
Where remodels go sideways is when someone tries to recreate that with a ledger, side-mounted hangers, or a bunch of splices and assumes it is the same thing. Sometimes those details can work, but they are not automatically equivalent to continuous joists. If your cantilever concept depends on hangers, ledgers, or splicing existing joists, that is where I want a clear plan detail (or a stamp) before I start nailing.
Framing details that make it work
Most cantilever failures I have seen were not because someone was off by a half inch. They were because the details that make the joists act as a system were missing. Once the numbers work, the details are what keep it stiff and quiet.
1) Use continuous joists when you can
The cleanest bump-out is formed when the same joists that frame the main floor simply extend past the wall line. That gives you continuity and reduces reliance on hangers and splices.
If you have to splice or sister, treat that as a structural connection, not just extra wood. In many cases, that becomes an engineer call.
2) Support the bump-out wall properly
Exterior walls concentrate load along their bottom plate. When that plate sits on cantilevered joists, doubling joists under the wall line is a common way to:
- Reduce joist rotation
- Increase stiffness at the overhang
- Provide better nailing for rim and sheathing edges
Whether doubling is required depends on loads and design. But as a framer, I plan the layout so the wall lands cleanly over joists and blocking, not over empty bays.
3) Install solid blocking at the support line
This is the part a lot of DIY bump-outs miss. At the exterior wall line, the joists want to rotate because the load is outside the support. Solid blocking or an approved strongback detail helps keep the joists upright and sharing load.
- Use full-depth solid blocks or an approved blocking panel detail.
- Fasten per plan, code table, connector schedule, or manufacturer detail. If you are relying on blocking to resist rotation, use a positive, specified nailing or connector pattern, not hope.
- Keep blocks tight. Gaps become squeaks.
4) Rim board matters
The rim at the cantilever edge ties joist ends together, provides backing for exterior sheathing, and helps resist rotation. A weak rim detail makes the overhang feel spongy.
Good practice:
- Use the correct rim thickness and material for the joist system.
- Fasten per code or engineered schedule. Random nail spacing is not a schedule.
- Keep the rim straight and crowned consistently so the outside wall stays true.
5) Subfloor fastening affects stiffness
I treat the subfloor as a structural skin. On a cantilever, that skin does real work for stiffness and feel.
- Subfloor adhesive helps a lot with stiffness and squeak control (even when it is not strictly required).
- Fasten with the correct nail or screw schedule.
- Stagger seams, avoid tiny strips at the outside edge, and block unsupported edges.
If you want a clean, frustration-free build, square the framing before you start locking it in with sheathing. This same habit saves cantilevers from becoming permanent parallelograms: How to Square a Wall Frame Before Standing It.
Plumbing and HVAC routing
The cantilever zone is a bad place to get creative with holes and notches. If there is plumbing in the way, I would rather change the route than weaken the joists where they are already doing extra work.
- Reroute to an interior bay if you can, then run out where the structure is supported.
- Use a soffit or chase inside the room instead of carving up joists.
- If a cut is unavoidable, treat it as an engineered repair, especially in the cantilever and near the support line.
Insulation and moisture
Cantilevered floors are notorious for cold floors and moisture problems because they are exposed on the underside and often have awkward cavities.
What I watch for
- Wind washing: air moving through insulation kills performance. You need an air barrier, not just batts.
- Vapor strategy: depends on your climate zone and assembly. In the PNW, keeping bulk water out and drying potential intact is the name of the game.
- Blocking at bays: close off bays cleanly at transitions so you are not turning your floor system into an air duct.
Also plan your fire blocking early. A bump-out can create concealed spaces that still need to be properly blocked. If you are not sure where fire blocking applies, read: Fire Blocking in Residential Framing.
Inspection reality
In a lot of jurisdictions, cantilevers get a closer look when they carry exterior walls above, roof loads, or any kind of point load. On engineered floor systems, inspectors often want the manufacturer cantilever detail available on site. The best builds are the ones where the framing matches the paper, and the paper matches what the building department expects.
Mistakes I see
- No real backspan: extending joists past a wall when the interior end is not properly supported.
- Cutting or notching in the cantilever zone: especially for plumbing and vents. Reroute if you can. If you cannot, get an engineered repair.
- Skipping blocking at the wall line: joists roll, drywall cracks, floors feel loose.
- Weak rim detail: rim not fastened correctly, rim not sized correctly, or rim breaks at corners.
- Overhang carries more than it should: people bump out a floor and then stack a heavy wall above or land a concentrated roof load on it.
- Ignoring layout: wall lands between joists, requiring patchwork blocking that never feels as solid.
Planning sequence
- Confirm joist direction and next support inside the house.
- Measure available backspan from the exterior wall line to the next bearing point.
- Sanity-check the ratio (aim for cantilever ≤ backspan/4 for typical residential conditions unless plans say otherwise).
- Decide what loads sit on the bump-out. If you are carrying walls above or roof load, slow down and verify the design.
- Lay out joists so the exterior wall lands cleanly over framing, not over voids.
- Detail blocking, rim, and subfloor fastening before you start cutting.
- Plan insulation and fire blocking as part of the framing, not as an afterthought.
FAQ
How far can a floor joist cantilever?
A common gut-check for typical residential floors framed with sawn lumber is around one-quarter of the backspan. The real limit depends on joist size, spacing, species, and loading, and on whether the cantilever carries exterior walls or roof loads. When in doubt, use span tables, a stamped detail, or the joist manufacturer cantilever details.
Can I build a cantilever bump-out with I-joists?
Yes, but you must follow the joist manufacturer’s cantilever, blocking, and stiffener details. Do not wing it with web stiffeners, blocking, or holes.
Do I need to double joists for a bump-out wall?
Not always, but it is common, especially when the exterior wall sits directly on the cantilever. Doubling improves stiffness and helps resist joist rotation. Whether it is required should come from your plan set, span tables, or engineering.
What matters most in a cantilevered floor?
The system works when the joists stay upright and act together. In practice that means solid blocking at the support line, a properly fastened rim, and a well-fastened subfloor.
Build it like a lever
A cantilevered bump-out is basically a controlled lever. If you respect the ratio, keep the load path continuous, and frame the details that stop rotation, it can feel as solid as the rest of the house. If you treat it like a simple add-on box, it will announce itself every time someone walks across it.
If you are working in a remodel and need to reframe supports to make the backspan work, take a look at How to Frame a Load-Bearing Wall in a Remodel. Cantilevers are not hard, but they demand honest structure underneath.