

I still remember the first time an inspector failed a wall I was proud of. Plates were straight, studs were crowned, corners were tight. Then he pointed into a stud bay and said, “You built a chimney.” That was my crash course in fire blocking.
Fire blocking is not about making a house fireproof. It is about slowing the hidden pathways that let flame and hot smoke race through framing voids, soffits, and floor systems. If you frame long uninterrupted cavities, you are basically gifting a fire a clear run. The good news is that fire blocking is one of those code items that looks mysterious until you see the logic and learn a repeatable installation rhythm.
Fire blocking vs draft stopping
These two get lumped together on jobsites, but they are doing different work. Also, triggers vary by jurisdiction and by the specific concealed space. What follows is the jobsite version of what the model codes are trying to accomplish.
Fire blocking (tight choke points)
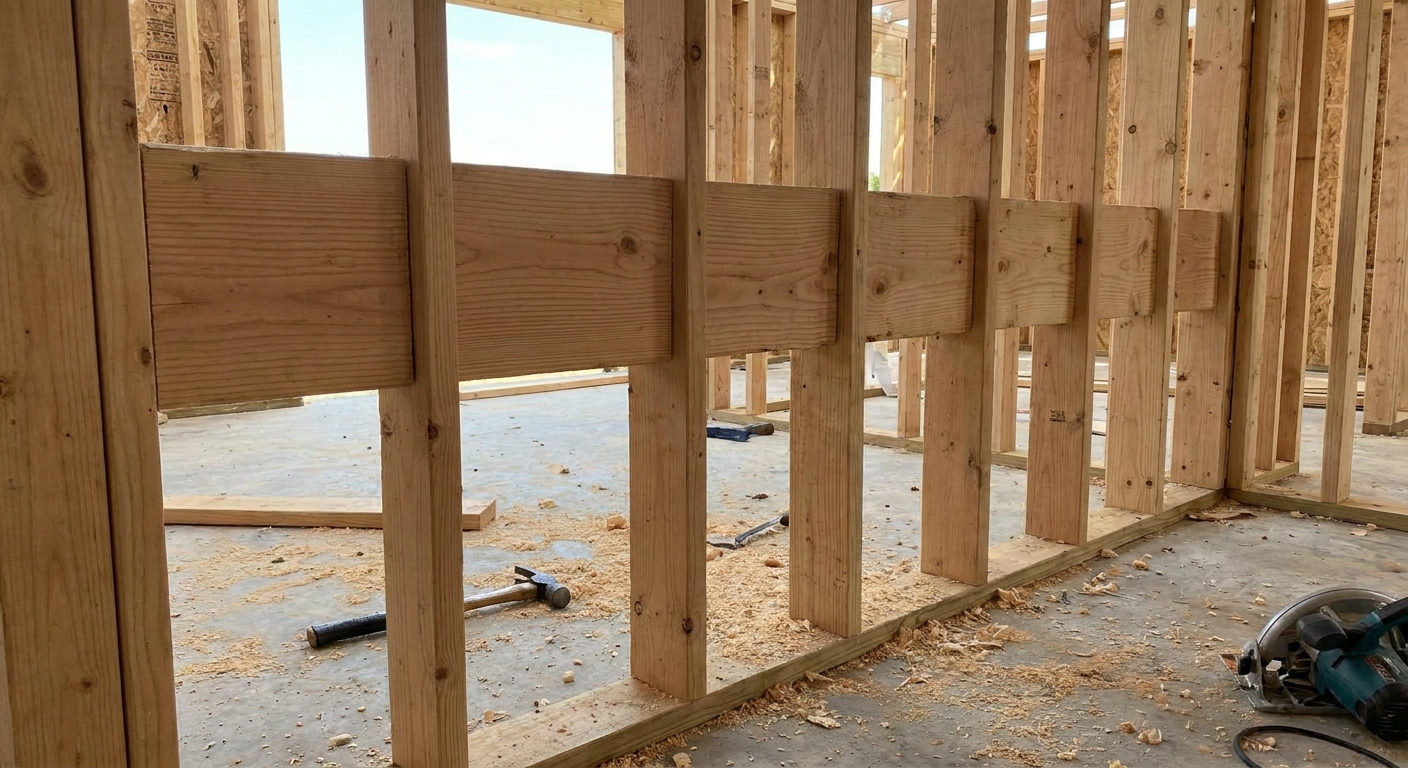
Fire blocking is placed to break up concealed vertical and horizontal spaces so fire cannot freely travel inside cavities. Think of it as building speed bumps and roadblocks inside framing voids.
- Where it shows up: stud walls, furred spaces, soffits, stair stringer pockets, dropped ceilings, around chimneys and flues, at interconnections between floors, and at penetrations that open one concealed cavity into another.
- Goal: create a tight barrier, supported and fastened, with gaps sealed as required.
Draft stopping (big area separators)
Draft stopping is typically used in larger concealed spaces to limit air movement, which slows smoke and heat spread. Expect it in attics, some floor systems, and long concealed horizontal voids.
- Where it shows up: attics, floor cavities over basements or crawlspaces, and concealed roof or floor assemblies with large open areas.
- Goal: subdivide large hidden areas into smaller compartments.
If you want a broader framing-code orientation before diving into details, I have more of the fundamentals pulled together in our Framing guide.
What the code is trying to prevent
Most residential codes (and most inspectors) are focused on a few repeat offenders. If you understand these, you can usually walk a rough frame and spot your own misses.
1) Tall, uninterrupted stud bays
Any time a wall cavity runs past a floor line or keeps going into an attic knee wall, you should hear that inspector voice: “chimney.”
2) Connected concealed spaces
Soffits tied into wall cavities. Dropped ceilings connected to chases. Plumbing walls that open into floor systems. Fire does not care that those spaces are “different areas.” If air can move, smoke and flame can move.
3) Penetrations that open cavities
Big holes around pipes, ducts, and chimneys are not just energy leaks. They are pathways. The block is only as good as the seal around it.
Common fire blocking locations
Local amendments vary, so always follow your jurisdiction and approved plans. But in plain jobsite terms, here are the places I check every time.
At floor lines in balloon-type framing
If a stud cavity runs from one level to the next without a plate stopping it, you generally need blocking at the floor level. Platform framing often “self blocks” at the floor deck and plates, but details can still create bypasses.
At ceiling lines and attic transitions
Knee walls, attic access framing, and any wall that opens into an attic space are frequent trouble spots. If your stud bay communicates with the attic, you often need a block at the top of the wall or at the transition.
At soffits and dropped ceilings
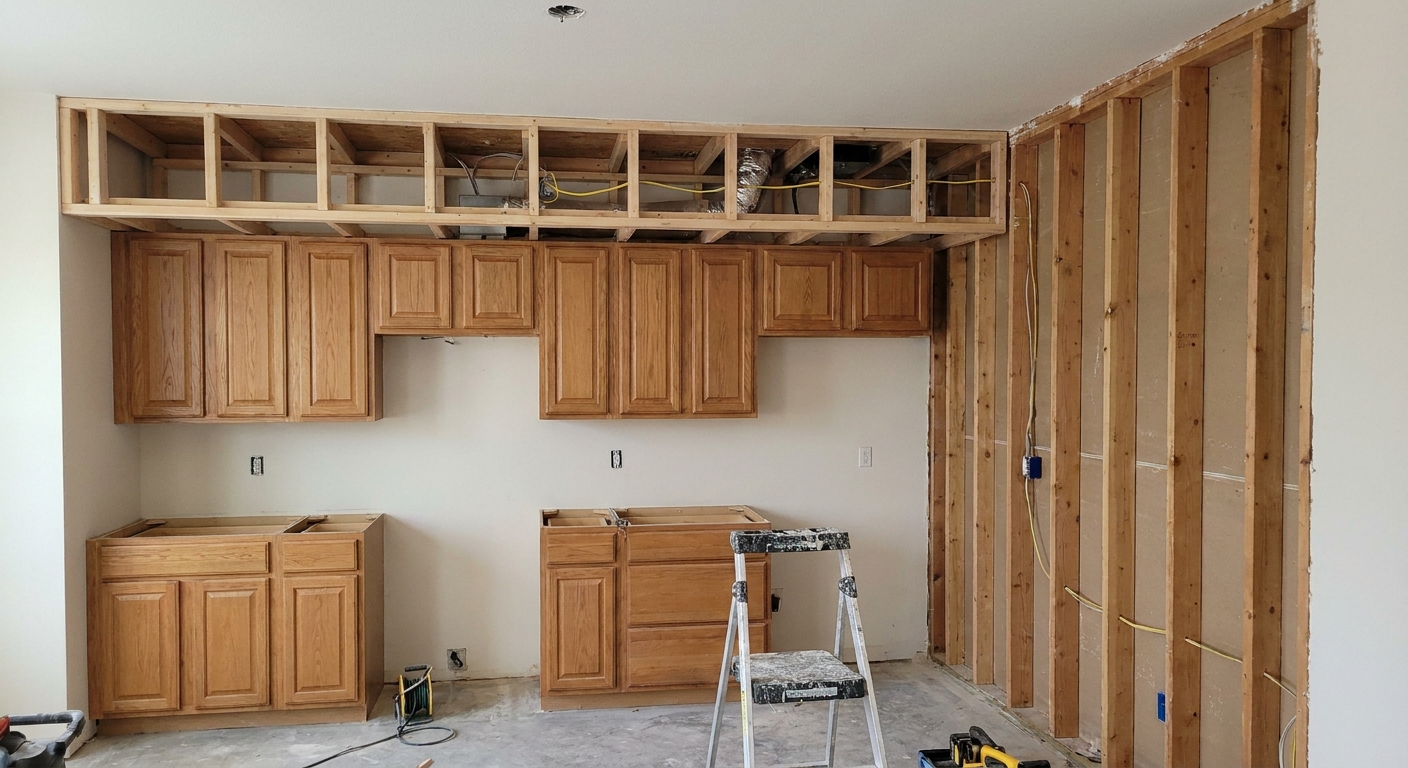
Soffits are notorious because they love to connect to wall cavities. Treat every soffit like a question: “Where does this void lead?” Then block it off.
At stairs and under-stair walls
Stairs create odd triangular cavities that can connect floors. If there is a concealed run, block it.
At chases for ducts and plumbing
Chases often need to be blocked at each floor level and at the top and bottom where they connect to other concealed spaces. How you do it depends on the chase design and what your plans call for.
At furred spaces and foam build-outs
Furring strips on masonry or basement walls can create a tall concealed cavity. Where that cavity is continuous, many jurisdictions require it to be blocked so it is not one uninterrupted run from bottom to top. The exact “where” is the key. Ends, transitions, and floor-to-floor breaks matter more than guessing an interval.
One code-pattern example
Here is a common one that people can picture.
Tub or shower on an exterior wall
You frame an exterior wall, then set a tub. Now you have a big hidden void behind the tub, and it often lines up with a stud bay that wants to keep going.
- The path: wall bay behind the tub can connect down into the floor system or up into a soffit or attic transition, depending on the layout.
- Where the block goes: close off the wall cavity at the tub deck height or at the floor line (wherever the concealed path actually opens), then seal the edges and any pipe penetrations so the cavity is truly interrupted.
This is the same “chimney” lesson, just dressed up in bathroom plumbing and weird angles.
Approved materials (what inspectors like)
Most codes allow several materials for fire blocking, but the best option is usually the one that installs tight, stays put, and is familiar to your inspector. Consider these common model-code categories as a starting point, then match your local rules and the product listing to the situation.
Solid lumber or structural panels
- 2x lumber blocks cut to fit snugly between studs.
- Plywood or OSB pieces used as blocking panels when thickness, support, and fastening meet local requirements.
This is the bread-and-butter approach for typical stud walls.
Gypsum board (when it is installed like a barrier)
Drywall is often permitted as fire blocking in specific conditions because it performs well in fire. The important part is that it must be installed as a tight, supported barrier of the required thickness. A random loose scrap shoved into a hole does not count in most inspections.
Noncombustible options (use as part of a system)
Some situations call for noncombustible materials, especially around certain heat sources or where required by listings and clearances. Sheet metal can be part of a listed firestopping approach around certain penetrations, but metal by itself is usually not the whole answer. In practice, it is commonly paired with an approved sealant or other listed material to complete the closure for that exact penetration.
Sealants and foam: use the right type
This is where DIY work gets red-tagged.
- Regular expanding foam is not automatically acceptable for fire blocking.
- Look for products clearly labeled as fireblock foam or a listed firestopping sealant for the application.
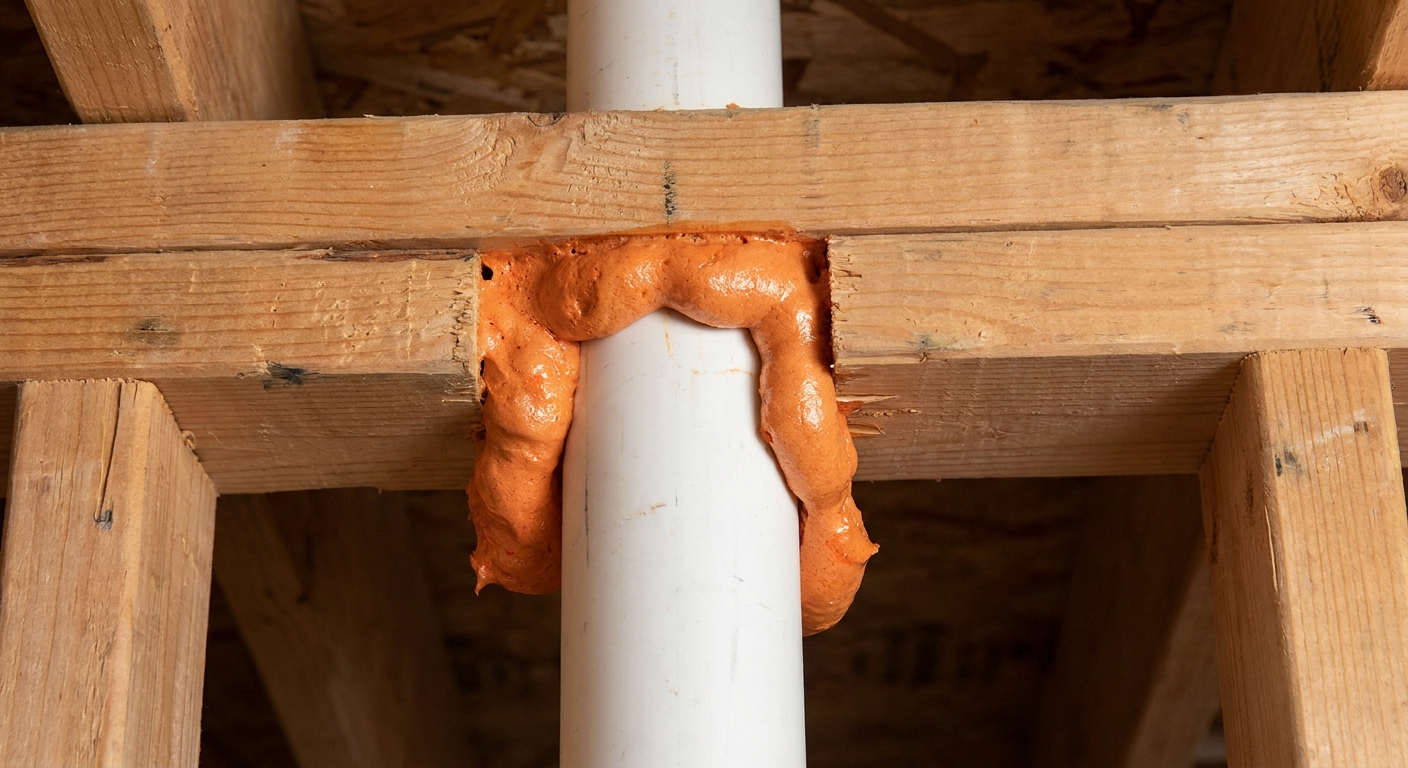
- Depending on the specific code section, the opening size, and the product listing, some jurisdictions allow fireblocking foam in limited cases without a separate wood block. Others still want a listed material closing the opening in a more rigid way. Either way, follow the labeling and your inspector’s expectations.
When in doubt, read the product labeling and installation instructions and match them to the gap size limits. A lot of “foam arguments” disappear when you can point to the listed use on the can.
How I install fire blocking
On a clean wall, fire blocking is fast. On a wall full of wires, pipes, and weird corners, it becomes a planning exercise. Either way, the goal is the same: tight, continuous blocks with proper fastening and sealed gaps where required.
Step 1: Trace the air path
Do not think “I need blocks at 10 feet.” Think “This stud bay connects the basement to the attic.” Trace the path with your eyes like air moving through it.
Step 2: Pick the simplest solid material
If it is an ordinary 2x4 wall with no congestion, I use 2x blocks cut tight. If the bay is crowded, a piece of plywood/OSB or gypsum might be easier to slip in and fasten.
Step 3: Cut snug, fasten solid
I aim for a snug fit without bowing the studs. Then I fasten with nails or screws appropriate to the material. The main failure I see is “floating blocks” that were toe-nailed once and left loose.
Step 4: Seal what needs sealing
Even good blocks can leave small cracks along stud faces, sheathing edges, or irregular cuts. Seal these where required with an approved fireblocking sealant or fireblock foam within its labeled limits.
Step 5: Re-check corners and soffits
Corners and intersections create hidden channels. Soffits create long horizontal runs. Do a second walk specifically looking for those, because that is where I miss things when I am moving fast.
Draft stopping basics
Draft stopping is easiest to think of as compartmentalizing. If you have a large concealed area, you divide it into smaller sections so smoke and hot gases cannot freely flow end to end. Where it is required depends on the size and layout of the concealed space and local interpretation.
Where you will see it
- Attics: especially where attic spaces connect across multiple areas or over attached garages, depending on design.
- Floor systems: long floor truss cavities or open-web systems that create a big plenum.
- Dropped ceilings: big continuous concealed ceiling voids.
Common materials
Gypsum board and wood structural panels are common draft stopping materials because they can cover larger spans. The key is secure fastening and continuity.
Because draft stopping requirements can hinge on geometry and area, I check local building department guidance when I am working in truss attics or engineered floor systems.
Notes on garages and rated walls
One quick caution: townhouses, duplexes, and any wall or ceiling called out as a rated separation (including some garage-to-house conditions) can come with a different set of rules than ordinary fire blocking in concealed spaces. If your plans call for a rated assembly, treat penetrations and openings like a “listed system” problem, not a “stuff a block in it” problem.
What fails at rough inspection
These are the repeat offenders I see, both on my own work when I get in a hurry and on DIY frames.
- Gaps you can see daylight through at the edge of a block.
- Blocks that are not fastened and can wiggle.
- Soffits left open to wall cavities, especially over cabinets and tubs.
- Plumbing and electrical penetrations through top plates with large annular spaces left unsealed.
- Chases not blocked at each floor level in multi-story runs.
- Assuming insulation is fire blocking. Some insulation types can help slow air movement, but it is not automatically an approved substitute for required blocking.
The simplest self-check is: if you can trace a continuous hidden air path with your finger from one level to another, you probably need a block or stop somewhere along that path.
My pre-inspection checklist
- Walk every exterior wall top plate line and look for openings into soffits, attics, and chases.
- Check behind tub walls, shower plumbing walls, and kitchen soffits.
- Look at every duct and plumbing chase at each floor level.
- Inspect garage to house transitions and any dropped ceiling in that zone.
- Confirm blocks are tight and fastened, not just wedged.
- Seal small gaps at the perimeter of blocks and around penetrations with an approved product.
If you are already in planning mode for a project, it helps to think about fire blocking early the same way you would think about material takeoff. I approach both with the same mindset: plan before you cut. This pairs well with making a cut list before buying wood, even for rough framing, because blocking pieces add up fast.
FAQ
Is fire blocking required in every stud bay?
Not usually. In typical platform framing, the plates and floor assemblies often interrupt cavities naturally. Fire blocking is commonly required where concealed spaces are continuous or interconnected, like chases, soffits, furred spaces, and any framing configuration that creates a tall uninterrupted cavity.
Can I use spray foam as fire blocking?
Only if it is a product specifically listed and labeled for fireblocking and only within the manufacturer’s allowed gap sizes and conditions. Whether foam can replace a solid block depends on the exact opening, the code section your inspector is applying, and the product listing. When I use foam, it is most often to seal the edges of a solid block, not to guess my way through a big opening.
Do I need fire blocking around electrical boxes?
An ordinary electrical box in a stud bay typically does not trigger special fire blocking by itself, but openings that connect concealed spaces, like holes through top plates and bottom plates, or large gaps around penetrations, often need to be sealed. Also, some rated assemblies have very specific requirements, so follow plans where applicable.
What is the difference between fire blocking and fire stopping?
In casual framing talk, people use the terms interchangeably. Strictly speaking, firestopping is often used for tested systems in rated assemblies, especially around penetrations, while fireblocking is the code-required blocking in concealed spaces in typical wood framing. Your building department may use one term more than the other, but the inspection intent is the same: stop hidden fire and smoke pathways.
Where can I read the code language?
If you want to see the baseline model language, the International Code Council publishes the International Residential Code (IRC). Many jurisdictions adopt it with amendments, so your local rules control. You can start here: https://codes.iccsafe.org/.
Build for how smoke moves
That is the mental trick that made fire blocking click for me. Do not frame for how it looks from the room. Frame for how smoke would travel behind the drywall.
If you build your blocks tight, fasten them solid, and seal the edges where required, you will walk into rough inspection with a lot more confidence. And you will sleep better knowing you did not leave a hidden highway inside your walls.
For more nuts-and-bolts framing technique, you can browse the Framing guide and get familiar with the way I approach layout and sequence.