

I grew up sweeping sawdust off shop floors and hearing the same rule on repeat: measure twice, cut once. Bathroom subfloor repairs are where that rule pays rent. When a toilet has been leaking just long enough, the floor can look “mostly fine” until you step near the flange and feel that soft, spongy give. The goal is not just to cover the rot. It is to cut it out cleanly, tie the patch into solid framing, and put the floor back together so it feels like one continuous sheet again.
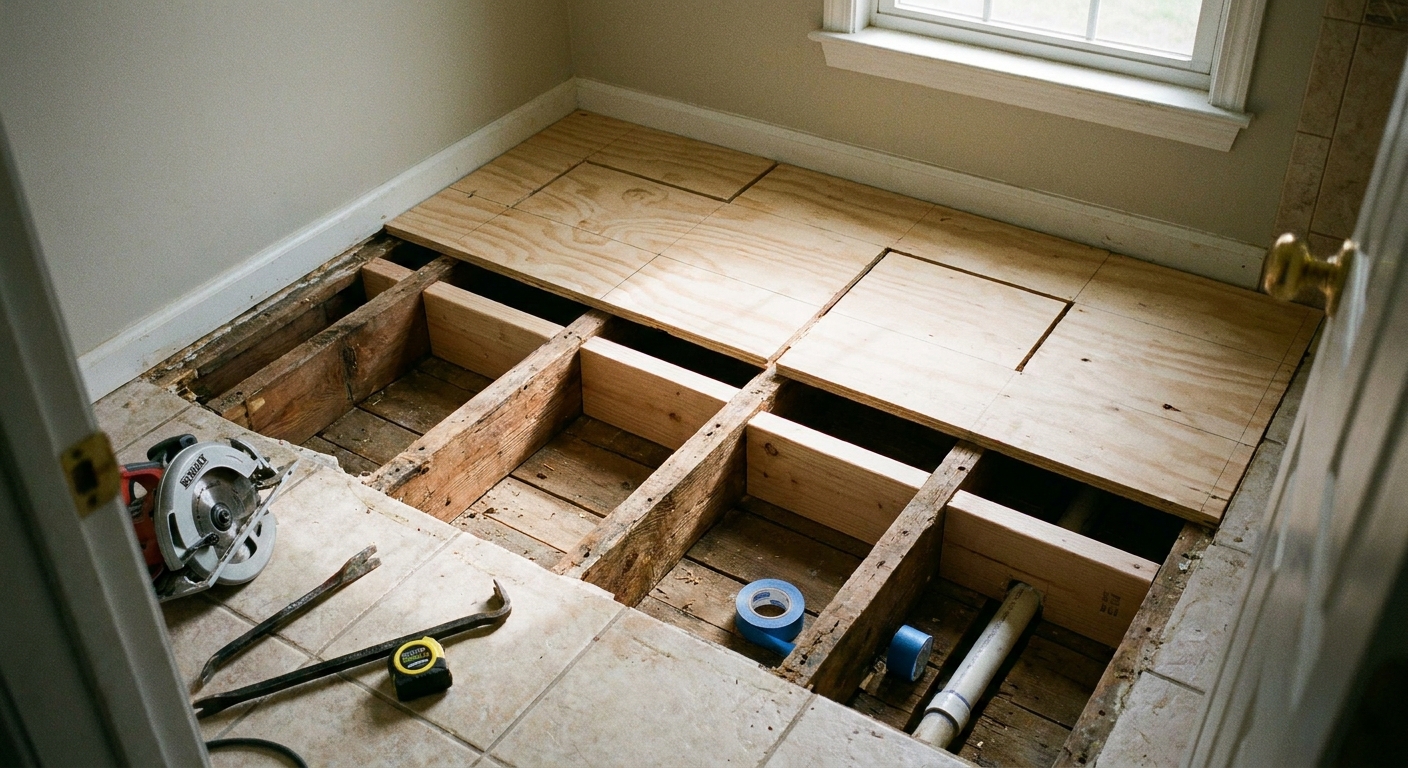
This guide assumes the finish floor is already up (or you are willing to remove it) and that the subfloor is plywood or OSB over joists. If you are also fighting squeaks elsewhere, the same mindset applies from my floor framing days: tighten the system before you cover it. My full approach is in Prevent Floor Squeaks Before the Subfloor Goes Down, and you can use those principles during a repair too.
Safety and the cause
Rot is a symptom. The cause is almost always a leak at the toilet wax ring, a loose flange, a failed tub drain, or chronic splashing that kept the floor wet. Before you patch anything, make sure the moisture source is stopped.
- Turn off water to the toilet and disconnect the supply line.
- Wear PPE: safety glasses, gloves, and hearing protection. Use a respirator if you are disturbing old materials, musty insulation, or suspect mold.
- Ventilate the room. A box fan and open window help, and a dehumidifier is even better if the wood is damp.
- Check below if you have access. Water stains on the ceiling under the bath usually tell you the leak has been active longer than you think.
- Plan for plumbing and wiring in the cut zone. Toilets are simple, but bathrooms often have supply lines, drains, and sometimes heat vents nearby.
Tools and materials
Tools
- Circular saw (or oscillating multi-tool for tight spots)
- Drill and driver bits
- Pry bar and flat bar
- Hammer
- Chalk line or straightedge
- Tape measure, square, pencil
- Shop vac
Materials
- Subfloor patch panel: Match thickness to existing subfloor (commonly 3/4 inch) and use a subfloor-rated panel. If the existing is OSB, I prefer to patch with subfloor-rated OSB or a proper subfloor plywood of the same thickness, not thin “utility” ply. If the rest of the floor is tongue-and-groove (T&G), a square-edge patch still works when you add proper blocking.
- Blocking: 2x material (2x6, 2x8, or 2x10) depending on joist depth and access. 2x4 can work for edge backing when space is tight, but stiffer is better if you have room.
- Fasteners: Use coated deck screws or structural wood screws sized to bite framing by at least 1 inch. Avoid drywall screws. They are brittle and love to snap when a floor moves.
- Construction adhesive (subfloor adhesive)
- Optional: joist hanger nails or structural screws if you are adding substantial framing supports
If you do not already have a cut list going, this is one of those repairs where a 10-minute plan saves you multiple trips. I keep it simple and still write it down. See Make a Cut List Before Buying Wood for the method I use.
Step 1: Pull the toilet
Remove the toilet so you can see what is actually going on around the flange.
- Shut off the valve, flush, and sponge out the remaining water from the tank and bowl.
- Disconnect the supply line.
- Remove the caps and nuts at the base, then rock the toilet gently to break the wax seal.
- Lift the toilet straight up and set it on a piece of cardboard or an old towel.
- Plug the drain with a rag to block sewer gas.
Now probe the subfloor with a screwdriver near the flange and outward until you find solid wood. Mark the boundary where the tool stops sinking and the wood feels firm.
Step 2: Lay out cut lines
A strong patch is more about the edges than the middle. You want your patch edges supported on framing or blocking, not floating in midair.
How to locate joists
- Look for fastener rows in the existing subfloor.
- Measure from a known wall. Many floors are 16 inches on center, but never assume.
- Check from below if you have basement or crawlspace access, or drill a small test hole where it will be covered.
Lay out a square or rectangle that removes all damaged material plus a little margin into sound wood. Avoid thin “L” shapes. Straight cuts are easier to support and easier to fasten without squeaks.
Rule I follow: If the cut does not land on a joist, plan to add blocking under that edge.
If the damage runs under a wall plate or partition, slow down. You may be into load-bearing territory or you may need temporary support and a different repair plan.
Step 3: Cut out the rot
Set your circular saw depth to match the subfloor thickness and no more. You are trying to cut the panel, not the plumbing, wiring, or joists under it.
- Snap or draw straight cut lines.
- If you suspect pipes or wires in the bay, start the first cut with an oscillating tool to confirm what is below before you commit to a plunge cut.
- Cut along the lines, stopping short of walls and corners.
- Finish corners and close-to-wall cuts with an oscillating tool.
- Pry up the damaged piece and pull any remaining fasteners.
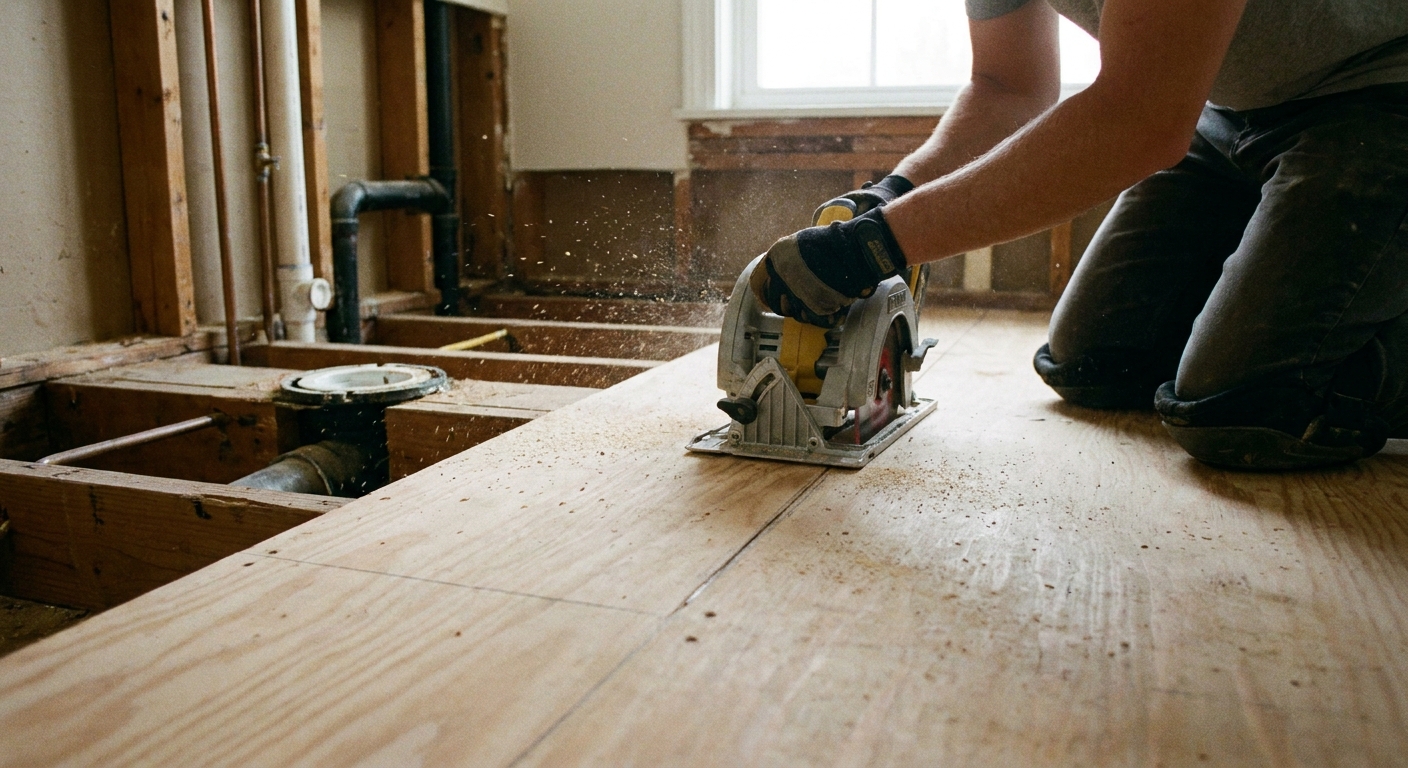
Vacuum out debris and scrape off old adhesive ridges so the patch can sit flat.
Step 4: Check framing and dry it out
With the subfloor open, inspect the joists and the area around the toilet flange.
- Surface staining is common and not automatically a structural problem.
- Soft, punky wood you can dig out with a screwdriver is a problem.
- Cracked or notched joists near the flange area need attention before you close up.
Do not trap moisture under a new patch. If framing is damp, run a fan and dehumidifier, and give it time to dry. Replace wet insulation if there is any in the bay.
If joists are compromised, the repair moves beyond a simple patch. In that case, consider sistering the joist. The approach is similar to what I cover in How to Sister Floor Joists, and it is worth doing before you put finish flooring back down.
Step 5: Add blocking
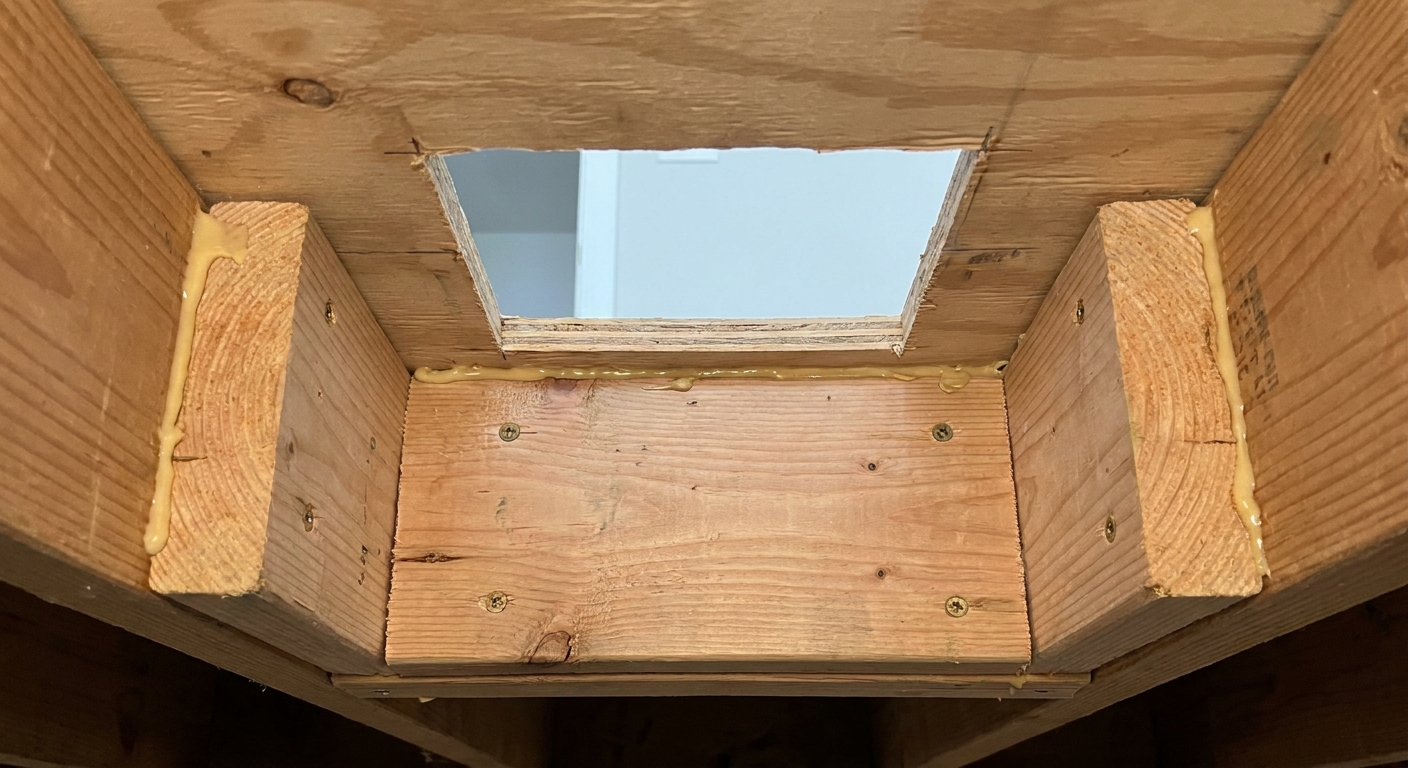
This is the make-or-break step. Blocking gives your patch something solid to land on, and it locks the old subfloor and new patch together so they act as one floor again.
Blocking options
- Edge blocking (cleats): A 2x runs under the seam so half supports the existing subfloor and half supports the patch.
- Between-joist blocking: Short 2x pieces installed perpendicular between joists under a patch edge.
- Sister ledgers: A 2x fastened alongside a joist to create a wider fastening surface, especially helpful if the old edge is ragged.
How I do it
- Cut blocking to fit snug, but not forced, between joists.
- Butter the top of the blocking with construction adhesive where it will contact the subfloor.
- Screw the blocking in from the sides of the joists when possible.
- If you cannot access from the side, toe-screw the blocking and add screws down through the existing subfloor into the blocking.
Leave a little clearance for plumbing. Do not jam blocking against a drain line where it can rub and squeak later.
Step 6: Cut and fit the patch
Cut your patch so it fits with a small gap around the perimeter. Wood moves with humidity, and a tight patch can telegraph a ridge into tile or squeak against the old panel.
- Aim for about 1/8 inch gap at the edges where the patch meets old subfloor.
- Make sure the patch face grain runs the same direction as the existing panel, typically perpendicular to joists.
- Dry-fit the patch before any adhesive. It should sit flat and land fully on blocking or joists along all edges.
If the patch rocks, stop and find out why. Usually it is debris on top of a joist, a swollen edge of old OSB, or blocking that is a hair proud. Fix that now, not after it is screwed down.
Step 7: Glue and screw
Once the fit is right, lock it in.
- Apply a bead of subfloor adhesive on joists and blocking where the patch will sit.
- Set the patch in place.
- Screw the patch down starting near the center and working outward.
Adhesive is a big part of keeping a repair quiet. The tradeoff is that it makes future removal harder if you ever need access from above. In bathrooms, I still lean toward glue because movement is what breaks tile and toilet seals.
Screw schedule
- Along edges: screws about 6 inches on center
- In the field: screws about 8 inches on center (a conservative repair schedule for a stiff patch)
- Keep screws back roughly 3/8 to 1/2 inch from the panel edge to avoid splitting or “mushrooming” plywood
Do not rely on nails for a repair like this. Screws pull the layers together and stay tight.
Step 8: Fix the flange area
The flange area is where many bathroom floors fail again. The flange should be solidly supported and sit at the correct height relative to the finished floor.
- If the flange is loose, cracked, or sitting on rotten wood, repair or replace it.
- In many installs, the flange ends up on top of the finished tile, not buried below it.
- If the flange ends up low, flange extenders or repair rings can be a clean fix, assuming the underlying pipe and flange are in good shape.
- Add extra blocking around the flange opening if needed so the area does not flex when you tighten closet bolts.
If you are unsure about flange height and seal selection, follow the toilet and flange manufacturer instructions and local code requirements for your area.
Step 9: Get it flat
A subfloor patch can be structurally perfect and still cause finish problems if it is not flat.
- Check for a lip at the seam. Feather minor height differences with a floor patch compound approved for your finish flooring.
- Do not sand through plywood faces. If you need aggressive leveling, you are better off with the right underlayment or leveling product.
- Follow the flooring system. Tile typically wants a proper underlayment like cement board or an uncoupling membrane, installed to the product instructions.
Step 10: Reset the toilet
Once the floor is finished and the flange is right, reset the toilet carefully. Most repeat rot I see comes from a toilet that rocks and breaks the seal.
- Use a new wax ring or a modern gasket per the toilet and flange type.
- Set the toilet straight down without smearing the seal sideways.
- Tighten nuts evenly. Snug is good. Over-tightening can crack the base.
- If the toilet rocks, shim it solidly with plastic toilet shims.
- Caulk practice varies. Many pros leave a small gap at the back so a future leak shows itself. Some jurisdictions or manufacturers prefer a full caulk bead for hygiene. Do what your local code and toilet manufacturer call for.
Common mistakes
- Not cutting back far enough into solid wood. If you leave “questionable” material, it will keep crumbling.
- Floating edges with no blocking. That seam will move, squeak, and crack grout.
- Patch too tight with no expansion gap. Seasonal movement makes noise and ridges.
- Wrong screws. Drywall screws are not your friend in a floor.
- Skipping adhesive when you want a quiet floor. Screws alone can still squeak if the panel can rub on framing.
- Ignoring the flange. A solid patch does not help if the toilet is still leaking or rocking.
When to call a pro
A patch is a good DIY repair when the damage is localized and the framing is sound. Consider bringing in a pro if:
- Joists, rim board, or wall plates are rotted
- You see widespread mold or persistent moisture you cannot trace
- The toilet drain or vent needs rework
- The floor system is noticeably out of level or bouncy beyond the patch area
- The rot disappears under a wall, tub, or shower base
Related guides
If you take nothing else from this: cut clean, support every edge, glue and screw like you mean it. A bathroom floor gets punished. Build the patch so it feels boring underfoot for the next twenty years.