Learn How to Build Stairs
In order to advance your carpentry career you should learn how to build
stairs. If you can cut a roof then learning how to cut and install steps
should be fairly easy. The rise and run involved with step building are
similar to roof framing in many ways. Even basic straight run steps are
slightly different from one framing job to the next. There are strict guidelines that must be followed in order to construct a set of steps that will be sturdy, safe to navigate, and satisfy the building inspector. The following information is the method I use for site built steps.
Local Building Codes
Long gone are the days of building steps that are too steep, shoddily constructed, and with insufficient headroom. Most local building codes are very strict and have specific guidelines for building steps. In order to know how to build them you must be familiar with these local ordinances.
New Stair Building Forum
Most Common Building Codes
length of the stairway. This height is not only so people won’t bump
their heads easily but also for moving furniture.
height should be between 34 and 38 inches measured vertically from the
treads bull nose. A handrail should be provided on one side of every set
with 4 risers or more. Handrails must not protrude into stairway path
more than 4 1/2″
shall not be more than 7 3/4″ and not vary more than 3/8″ from greatest
to least. Be careful on this one, I’ve seen the riser height anywhere
from 7 7/16″ to 8 1/8″ and not allowed to vary more than 1/8″.
Formula for Site Built Steps
It doesn’t matter what type of staircase you are building, straight, L
shaped with a landing, curved, complete turn around 180 degree, or
winders. You must determine the overall rise and run, then divide it into comfortable increments.
In house framing this distance is usually from the first floor to the second or from the basement floor to the first floor.

Instructions on How to Build Steps
In this stair building tutorial we will be constructing a straight
set using three 2 X 12 stringers, 2 X carpeted treads, and a 2 X 4
spacer board to allow drywall and a 3/4 finish stringer board to be
inserted by the finish carpenter.
The overall rise is 8′ 10 3/4″ with a overall run of 11′ 2 7/8″.
I use a Construction Master calculator to figure my roofs and steps. A regular calculator can be used, but measurements should be taken in inches rather than feet and inches. Using a regular calculator has been discussed on the carpentry math page. There is also a free 30 day trial download on the roof framing page. Pick your poison, grab your regular calculator or the free download and lets see if you can learn how to build steps.
Determine Overall Rise and Run
The overall rise and run of the steps is determined by measuring the
space where the staircase is to fit. Keep in mind what type of floor
covering is to be used when determining rise between floors. If ceramic
tile or similar material is to be used it must be figured into the rise.
Measure horizontally where the steps are to land with the understanding
that you need a minimum of three feet of clear space before any
obstructions to the direction of travel.

Find Rise of Each Step
7 1/2″ is considered the perfect step, we divide 106.75 by 7.5 to find
out how many steps are needed. 106.75 divided by 7.5 = 14.233 since we
can’t have .233 of a step we need to drop it and divide the overall rise
by 14. 106.75 divided by 14 = 7.625 or 7 5/8″.
now know that this set of steps requires 14 equal increments of 7 5/8″
to climb from one floor to the next. Write this number down, it is one
of the keys to a step building success story.
Find Run of Each Step
134.875 by 13 = 10.375 or 10 3/8″ run per stair tread. The actual run
of the steps will be more due to the bottom step riser and the added
bull nose of the tread. Make sure you will still have the three feet of
required clear space at the bottom of the steps before laying out the
stringers.
Rise and Run Using Construction Master
|
The use of a Construction Master calculator is much faster and accurate than a regular calculator. To find the rise and run of each step we only need to enter 8′ 10″ 1/2 Risers 14, riser size 7 5/8″, treads 13, |
Mobile App
 |
Laying Out the Stringers
the proper length. I know this is easier said than done, #1 stock is
available, however most builders won’t supply it due to the added cost.
the framing square and beginning at the top of the stringer layout the
top plumb cut and the last tread. We now need to shorten the top cut by
the thickness of one riser, in our case 3/4″, so that the top tread will
be the same as all the rest. Failure to do this will require the top
tread to be 3/4″ wider than the rest resulting in possible rejection by
the building inspector, not a good story.
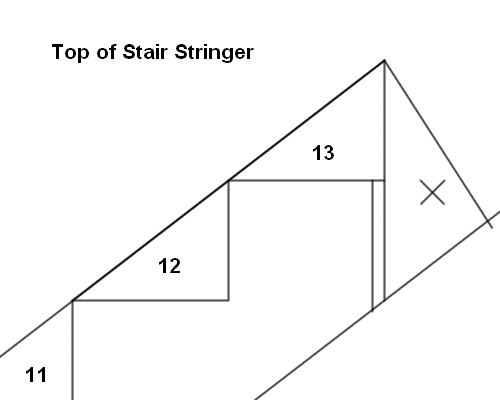

down the stringer and marking them as you go just like you would mark a
rafter using the step off method.
Write the number of treads in the triangular part that will be cut out
later until you have 13 treads marked out. These lay out marks are
critical to success and accuracy is the key.
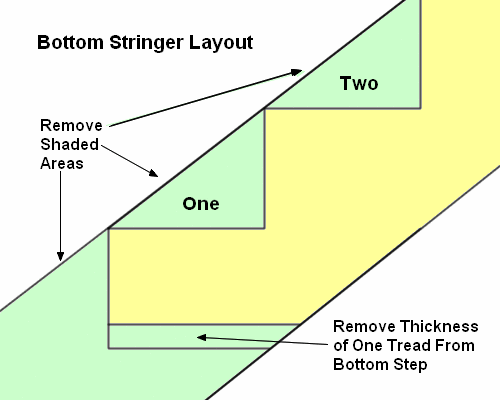
properly lay out the bottom of the stringer you must shorten the bottom
riser by the thickness of one tread, in our case 1 1/2″. This will
lower the entire stringer so when the bottom and top treads are attached
to the stringer they will be the same rise as all the rest.
you are satisfied that the stringer is properly marked out you can go
ahead and cut the top plumb and tread marks as well as the bottom level
and tread marks. We will test the stringer later and if it’s wrong you
can still get treads out of it and will not have wasted much material.
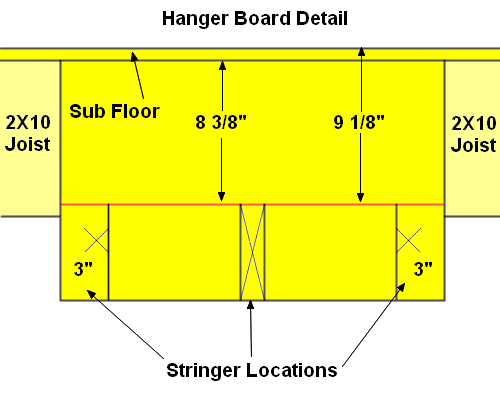
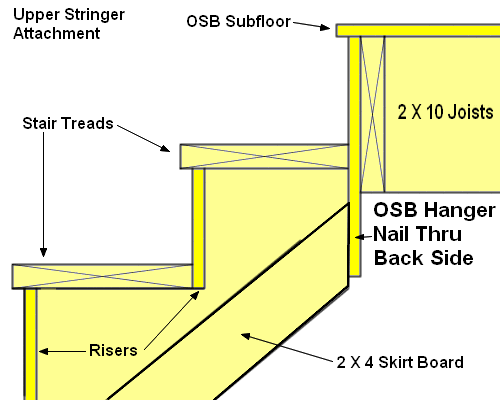
Attach Top of Stringers
floor joist to which it will rest against. With 2 X 10 floor joists, a
3/4″ subfloor, and 7 5/8″ riser height dropped an inch and a half this
means that the stringer will only bear against the joist 7/8 of an inch.
Not safe at all and a recipe for disaster, over the years I have found a
simple solution to this problem.
can now go ahead and lay out the hanger board to mark the location of
the stringers. Remember that the top of the stringer has been dropped
the thickness of a tread so hold it down accordingly. We can now go
ahead and mount the hanger board. Make sure to glue and nail it
securely.
Test the Stair Stringer
marked stringer which was cut on the top and bottom and hold it up to
the alignment marks on the hanger board.
to be certain you have the required three feet of clear space at the
bottom of the steps. Remember that when the bottom riser and tread are
installed the stairway will stick out another 1 3/4″ than the stringer
does now.
tread marks check to see if you have the required headroom. Remember
when the stair treads are installed they will be 1 1/2″ higher than the
marks.
Cutting the Stair Stringers
another decent 2 X 12, flush them up on the bottom, and temporarily nail
them together with 8 penny nails. One on each end should do it then
mark the cut top and bottom ends on the board below.
the skilsaw deeper than it needs to be and cut away, this will
eliminate the need to mark the next stringer because the saw has marked
it for you. With the stringers nailed together this reduces the chance
of the pattern slipping and causing errors.
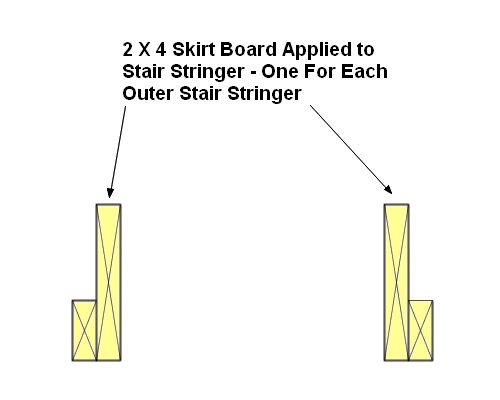
Apply Spacer Boards to Stringers
individual step a spacer board should be applied to the two outermost
stair stringers. If no finish stringer board is to be used then a 3/4″
board is enough to slide the drywall behind. Since we will be using a
finish stringer we will apply a 2 X 4.
Stair Building Instructions
Until this point not much work seems to have been done, but
without the proper planning and adherence to building codes we could
never get to the next step. It is now time to set the stair stringers in
place.
Set the two outside ones first,
glue and nail them securely thru the backside of the hanger board. Once
the two outside ones are in place set the center one.
a straight edge make sure the cut outs for riser and stair treads line
up. Slight variations of 1/8″ or less are normal and allowable.
you are satisfied the set of will meet code set, glue, and nail the
outside stringers into place. Place the middle one in the center of the
two outer stringers.
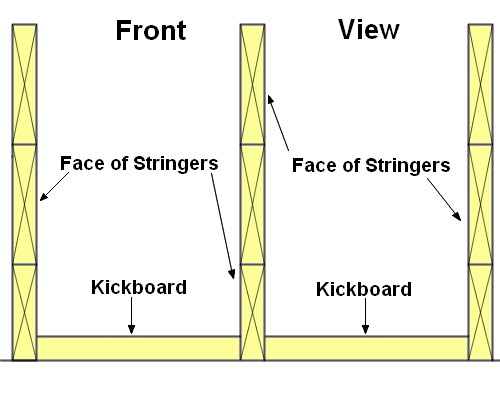
Attach Bottom of Stringers
Some carpenters cut the bottom stringer around a 2 X 4 kick board but I
usually just glue and nail a 2 X 4 in between the stringers.
Cut the Risers
treads is to use scrap 3/4″ orientated strand board for risers. There is
always plenty of it laying around.
the risers at least 1/4″ less than the actual rise of the steps, in
this case we will go with 7 1/4″. Which just happens to be the width of a
1 X 8 if you would rather use those.
bottom riser is different than the rest because of the dropping of the
stringer. In this case it will need to be ripped to 6 1/8″. So we need
one at 6 1/8″ and twelve at 7 1/4″ for a total of thirteen.
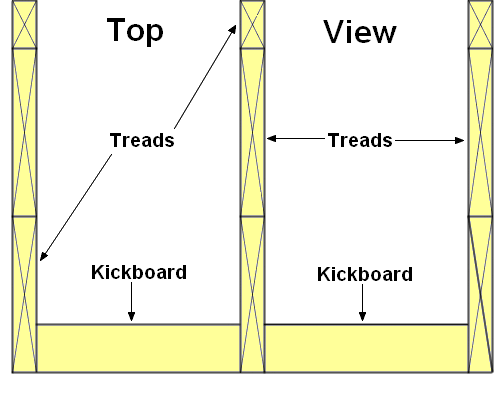
Cut the Treads
Since the run is 10 3/8″, and we are required to have a bull nose of
3/4″ to 1 1/4″, our treads need to be between 11 1/8″ and 11 5/8″. Lucky
for us, a 2 X 12 just happens to be 11 1/4″, so we won’t need to rip
them. We need thirteen of them cut to the proper length.
Install Risers and Treads
Tips on How to Build Stairs
- Do not skimp on glue, a wasted tube of glue is better than a squeaky set of stairs. Glue everywhere wood touches wood.
- Always check local building codes, most municipalities have strict guidelines.
- Measure two or three times and cut once.
- Don’t
be intimidated by this, many carpenters are, I even know a few with 20+
years experience that have never learned how to build stairs.
- The easiest way to learn how to build steps is to start with something simpler like a set of three or four step stairs. The basic principle of building is the same only on a smaller scale.
Links to Related Carpentry Pro Framer Pages
|
|
|