Cutting Rafters Accurately
Cutting rafters is not hard, the difficulty lies in finding the correct rafter length and using the framing square to
lay them out accurately. Nice tight rafter cuts are the key to a sturdy
well built roof. On this web page I will discuss the techniques used
for cutting common roof rafters.
There are only three basic methods I use to cut and mark rafters.
These I call one at a time, marking all at once, and gang cutting.
the simplest way to learn to cut common rafters. I would recommend this
technique to all homeowners, rookie carpenters, or anyone building a
small shed or other simple structure. This method requires the least amount of tools and carpentry experience to accomplish the task at hand.
over the one at a time technique, but requires more time to set up. It
works well on larger rafters especially if there are several rafters to
be cut. It requires no special tools but should only be used by highly
skilled carpenters.
Cutting Rafters One at a Time
One at a time is the best way for cutting a few rafters for a small
shed, dormer, or even a 24′ by 24′ garage. The steps involved are fairly
simple and once a rafter template has been made can be performed by
anyone reasonably skilled with a circular saw.
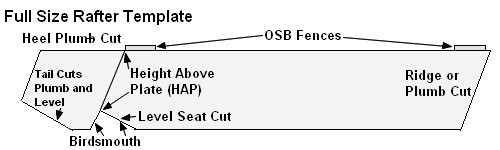
- Lay
out and cut a full sized rafter which will be used as a template for
all the rest. If you need help with this step visit the basic roof framing and framing square pages.
- To
make it easier to use the rafter pattern, cut two pieces of plywood or
similar material at 12″ X 3″. Secure the plywood strips to the top edge
of the rafter leaving 3/4 of an inch hang over each side of the rafter.
One strip near the top and the other on the height above plate mark just
above the birds mouth.
- Place rafter stock on your cutting horses with the crown facing away from you and leave a 2″ gap or so between each one so the template fences will fit between the lumber.
- Place
rafter template on top of lumber with the bottom of the rafter nearest
you. Pull fences tight to the top of the rafter to be marked and proceed
to mark all the cuts carefully. To save time you can have an assistant
mark one end and also help you move the template from board to board.
- Only
mark and cut two more rafters at this time, we need to test them to fit
before cutting all the rest. You will probably be forgiven for cutting
three rafters wrong, but forty wrong, may find you honing your carpentry
skills on a different job site.
- To test the rafters for fit you can nail a 2 X 4 block to the top plumb
cut of one of the common rafters to temporarily represent the ridge
board. Make sure the backside of the birds mouth is tight to the outside
wall and let the tops come together to check the fit. If they are open
on top then they are to long.
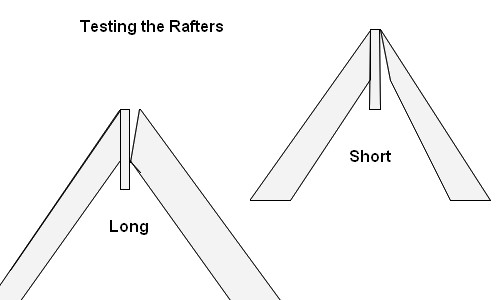
- Now is the time to make any corrections if necessary. Once you are
satisfied with the rafters go ahead and mark and cut the rest.
- When you start cutting rafters do the top or plumb cut first and then move on to the tail cuts saving the birds mouth for last.
Don’t give up your rafter pattern until you hear the words “I need one more”.
Marking Rafters All at Once
All of the rafters can be marked at once with the aid of some simple site built tools. After they are marked for length the top plumb,
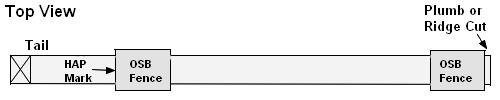
birds mouth, and tail cuts can be marked. A smaller rafter template can
be made with the proper cuts eliminating the need to move around a full
sized template, 22′ X 2 X 8 rafters are not uncommon, they are heavy
and awkward to handle.
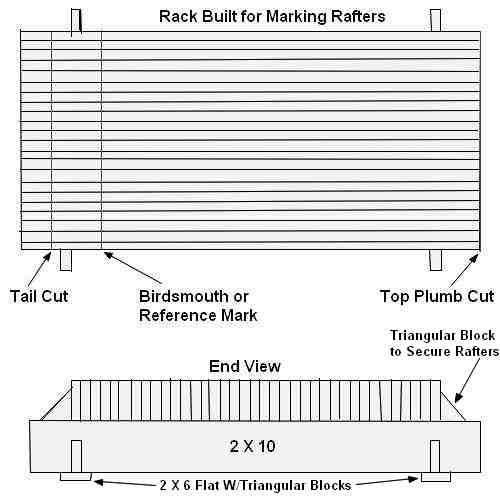
A set of heavy duty cutting
horses can be built on site to hold a rack of rafters. All you really
need are four 30″ 2 X 6s, two 16′ 2 X 10s or 8s, and twelve triangular
shaped blocks. The cut outs from stair stringers work well for these
blocks. Once the horses are built they can easily be moved to other job sites.
- Build the cutting horses on level ground close to the lumber pile,
so you won’t have to move the heavy rafters any further than necessary.
- Place the rafter stock in the horses crown up with about a foot hanging over on both ends.
- Flush up what will be the top plumb
cut of the rafters on one end. A good way to do this is with a 2 X 4
held on edge against the end and tapping the rafters back and forth
until they are all in a square line.
- Use
the triangular blocks to push the rafters tightly together. I prefer to
use screws to secure the blocks because the are easier to remove and
won’t move the rafters around like driving in nails.
- On
the top edge of one side of the rack measure / mark the length of the
birds mouth and tail cut. Do the same thing on the other side of the
rack and snap a chalk line to mark the rafters in between.
- After
the reference lines are correctly marked the rafters can then be taken
out of the rack and placed on their side with the crown facing away from
you.
- Using the smaller rafter template mark the plumb cut and move on down and the HAP mark with the one on the rafter stock and mark the birds mouth and tail cuts.
- As before you should always test two of the rafters before you begin cutting rafters in earnest.
Gang Cutting Rafters
If you are considering using this technique then you must already
know how to lay out and cut rafters. There are some expensive tools
involved with gang cutting but the time saved is great if you know what
you are doing. This procedure insures that all rafters will be the same
so bear in mind if they are wrong they will all be wrong.
Place the rafters in the cutting rack with the crowns facing down.
Square up and secure the rafters with the blocks and straps or whatever it takes to get them lined up reasonably well.
Mark and snap lines for the plumb, birds mouth, and tail cuts.
Using a worm drive saw and Prazi Beam Cutter set the saw to the correct angle and make the top and tail cuts.
Using a Big Foot Big Boy 15 Amp 14-Inch Wormdrive Circular Saw set it to the correct angles and make the birds mouth cuts in two separate passes.
Gang Cutting Rafters is Better Left to the Pros
Resource Material for Cutting Rafters
Roof Framers Bible 2nd Edition
A Roof Cutter’s Secrets to Framing the Custom Home
Links to Related Carpentry Pro Framer Pages
|
|
|