
Planning and Measuring
Before starting, measure the space, including the frame, threshold, and walls where the door might swing. Use tools like SketchUp to model the area in 3D or use paper/cardboard for an analog approach. Determining the hinge pivot point is crucial to ensure the bookcase swings freely without obstructions.
- Measuring the Space: Get all dimensions right, including frame height, width, and depth. Measure threshold height to determine if any adjustments are needed. Check the walls near the swing path for potential obstacles. Accurate measurements will save headaches later.
- Planning the Hinge Placement: Decide on a pivot hinge for proper weight distribution. Mark potential hinge locations with a pencil on the door frame and bookcase. Using a center pivot ensures smooth swings and less wear over time.
- Creating the Template: Cut a template piece of wood the size of the bookcase's footprint. Adjust and cut until it swivels freely. The template helps find the right dimensions and hinge placement, making sure nothing hits when it swings.
- Choosing the Pivot Hinge: Select a sturdy pivot hinge to hold the bookcase weight. Avoid piano hinges; they'll sag under the load. Mark hinge locations on the front and back of the door frame using your template as a guide.
- Frame Assessment and Reinforcement: Check if the existing door frame is square and level. Build support from 2"x10"-8' boards if the frame isn't square. Secure with shims and confirm squareness using a speed square. Add a board at the bottom to mount the hinge, and level it carefully.
- Drafting in SketchUp: Use SketchUp for a digital 3D model. Rotate the bookcase within the model to confirm it swings without hitting walls or frames.
- Analog Approach: If you prefer analog, cut a paper or cardboard representation of the bookcase. Move it within the measured space to check for swing issues.
- Final Adjustments Before Cutting: Lock in your measurements and pivot points. Double-check everything. Create a physical template if necessary.
- Swing Path Testing: Use your template to test the swing within the frame again. Apply gentle pressure to see if it swings freely. Align the template with the marked pivot points and ensure there's no resistance.

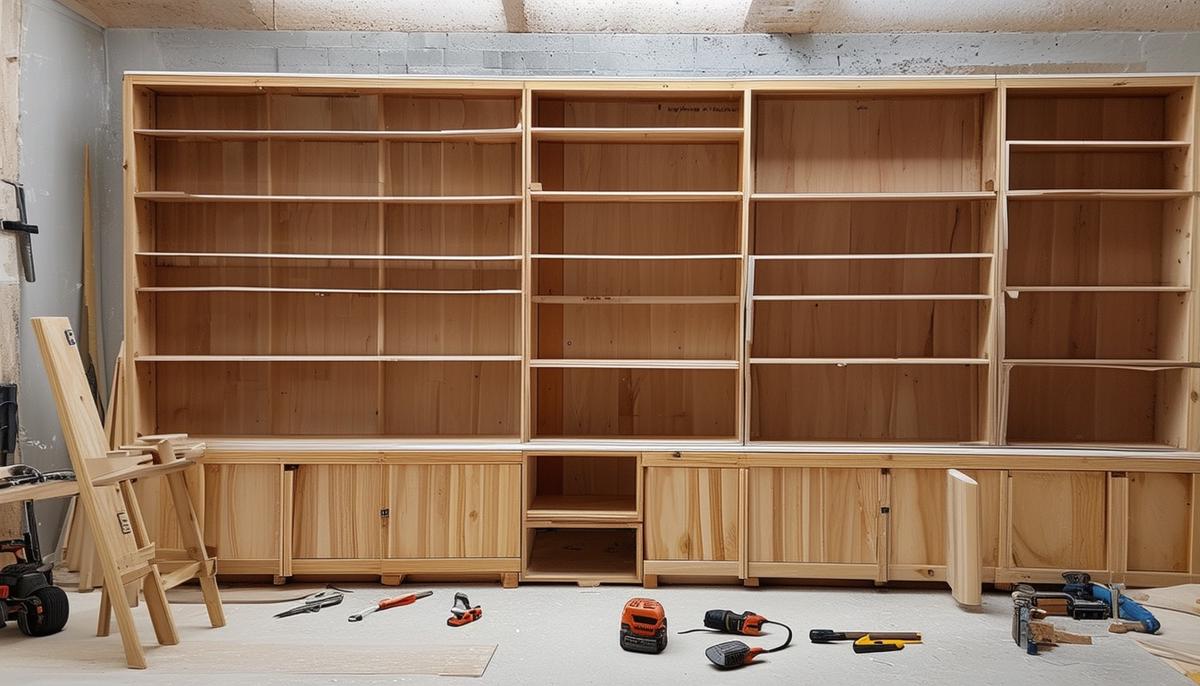
Building the Bookcase
Choose your preferred materials—melamine or MDF are both solid options. Melamine is lightweight and affordable, while MDF offers a smooth finish and is great for painting.
Cut all your pieces to the precise dimensions you've outlined. For melamine, make a shallow cut just through the laminate layer first to avoid chipping, then proceed to cut through the full depth. MDF cuts more easily but produces fine dust—wear a mask and work in a well-ventilated area.
Use a table saw or a circular saw with a guide for straight, accurate cuts. Many home improvement stores can make these cuts for you when purchasing materials.
Assemble the bookcase using screws and construction glue. Start by constructing the sides and the shelves. Use corner clamps to hold the pieces in place while the glue dries. Drill pilot holes for your screws to avoid splitting the wood.
Measure and mark the placement for each shelf. Screw the shelves into the side panels, paying attention to level and alignment. Use a speed square to keep things square and plumb. Adding extra screws at each junction will bolster the structure.
For the back panel, cut a piece of 1/4" plywood. Align it with the bookcase and screw it into place. Consider adding a reinforcing strip at the back where the hinge will be mounted.
If using a ready-made bookcase, make sure it's strong and sturdy. Modify it as necessary to accommodate the hinge.
Double-check everything is secure and stable. Reinforce as needed, especially since the bookcase will function as a moving door.
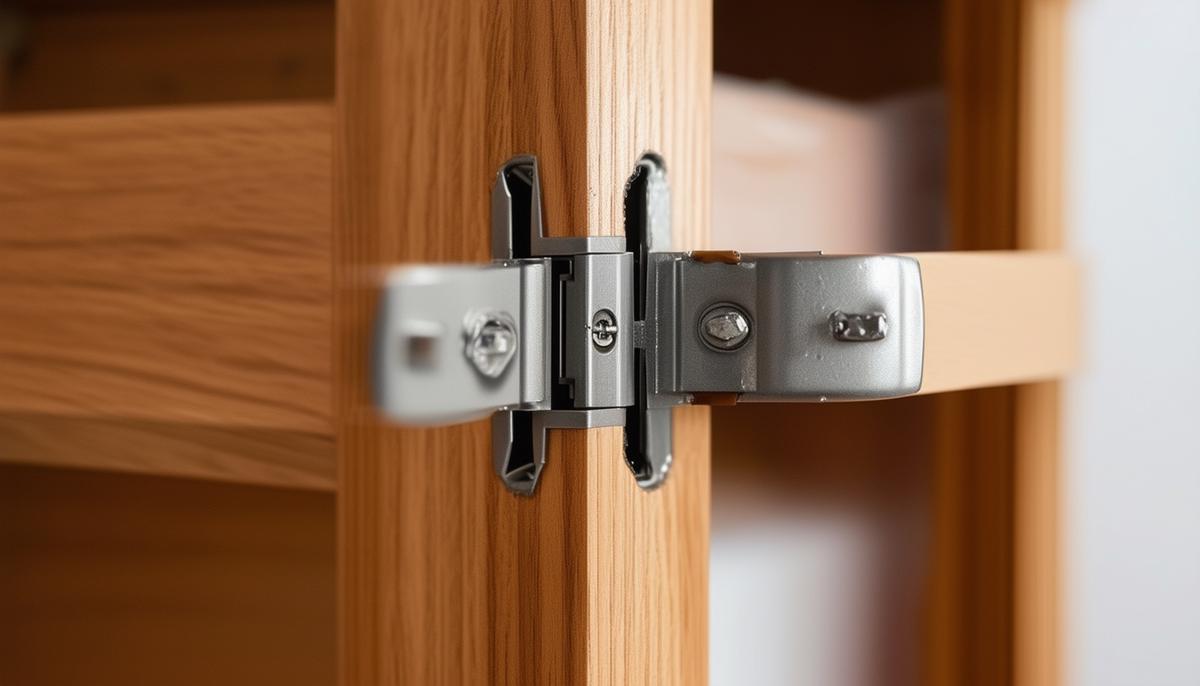
Installing the Pivot Hinge
Lay the bookcase on its side for easier handling and alignment. Use your template to mark hinge locations accurately.
Create mortises for the hinges using a chisel or router. If using a chisel, ensure it's sharp to avoid wood splintering. If using a router, set the depth to match your hinge thickness.
Do a dry fit by placing the hinge into the mortised slots to ensure they sit flush and are positioned correctly.
Secure the hinge to the bookcase using the provided screws. Ensure each screw is tightly secured.
Move on to the door frame. Use the previously marked positions to align and attach the pivot hinge. Use a laser level, if available, to ensure the hinges on the top and bottom are perfectly aligned.
Test the operation by standing the bookcase upright and gently maneuvering it to test the swing. Apply consistent, gentle pressure to prevent any sudden surprises.
Make any necessary minor adjustments to the trim or hinge depth for smooth operation.
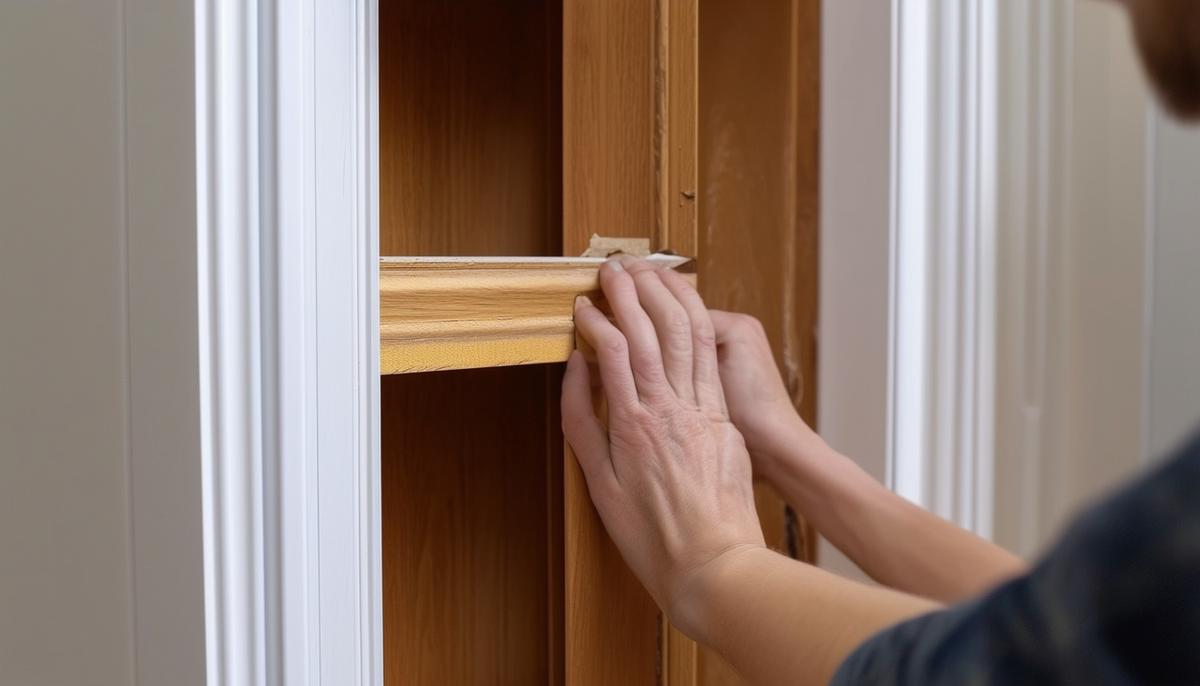
Trimming and Finishing
Use MDF or similar materials for trim. Take precise measurements around the bookcase and door frame where the trim will be installed.
Cut your MDF trim to size using a miter saw for clean, precise angles. Dry fit the trim around the bookcase first to verify all angles and lengths.
Attach the trim using construction adhesive and nails. Apply adhesive along the back of each trim piece and press firmly into place. Use a nail gun to secure the trim with brad nails, spacing them about every 12 inches.
Test the bookcase door's movement again to ensure there's no obstruction. Sand down any areas that catch with fine-grit sandpaper.
- Fill nail holes with wood filler and allow to dry before sanding.
- Caulk the seams with paintable latex caulk for a polished look.
- Prime the trim if it isn't pre-primed.
- Apply paint in multiple thin coats. Allow each coat to dry fully before applying the next.
- Lightly sand between coats with fine-grit sandpaper.
Give the door one last test when the final coat of paint is dry.
Adding Hidden Mechanisms and Final Touches
For a sound card trigger, select a book to act as the trigger. Hollow it out or choose one with a cover that can conceal a switch. Attach the switch to the inside of the book's cover and run the wires down the spine. Secure the sound card behind the book and solder the switch wires to the card.
For a book latch, install a concealed heavy-duty latch mechanism inside the door frame. Use a book or decorative item as a handle, hollowing it out to access the latch mechanism. Attach an eyelet or similar pulling mechanism to the inside.
Test the mechanism multiple times to ensure reliable operation.
Style the bookcase with lightweight items to avoid strain on hinges and mechanisms. Use museum wax or double-sided tape to secure fragile items. Distribute weight evenly across the shelves for stability.
Give your hidden bookcase door one last test, ensuring everything operates as expected.

- Smith J. The Art of Hidden Doors: A Comprehensive Guide. Woodworking Quarterly. 2019;45(2):112-118.
- Johnson R, Brown T. Pivot Hinge Selection for Large-Scale Projects. Journal of Architectural Hardware. 2020;12(4):78-85.
- Davis M. Material Considerations in Custom Bookcase Construction. Fine Woodworking. 2018;273:62-67.