Modern balloon framing, lay out and construction methods for framing a
gable wall. This wall framing method is only used in certain
situation’s by carpenter’s in today’s age of platform framing. In
today’s carpentry world there are many advantages and disadvantages to be considered before choosing this method.
Advantages
1. Greater strength to resist high wind loads.
2. Option to install large windows with vaulted or angled window tops, these angles are usually the same as the roof pitch.
Disadvantages
1. A path is created for fire to easily travel from one floor to the
next, the stud bay acts like a chimney. Most local code’s require fire
blocking be installed at each floor and ceiling level.
2. Longer framing member’s are required and the cost per lineal foot is more than standard pre cut framing stud’s.
3.
The top plates of balloon framed walls are often 17 feet or more above
the working platform. This height requires scaffolding for tradesmen.
Not only in the framing phase, but in all phases to follow.
4.
These walls can be very heavy and dangerous, even life threatening, to
raise requiring the use of proper lifting equipment and highly trained
personnel. The hazards of manually lifting balloon framed walls has been clearly defined by OSHA.
Common Uses
1. In a great room or two story foyer.
2. To build a tall chimney.
3. In a room where a cathedral or vaulted ceiling is located.
Gable Wall Framing
Balloon framing of gable walls is common in new home construction. It is usually done when there is a cathedral or vaulted ceiling in the room.
I would not recommend this framing method to a rookie carpenter or the average DIY person. A basic knowledge of conventional roof framing is required to lay out and complete this task.
The standard wall height, roof pitch, rafter size, and stand of the
common rafter must all be known before beginning the layout procedure.
Armed with this information an experienced carpenter can complete the
layout procedure in 5-10 minutes. I use a Construction Master
calculator to figure all my rafters, however I have discussed alternative method’s.
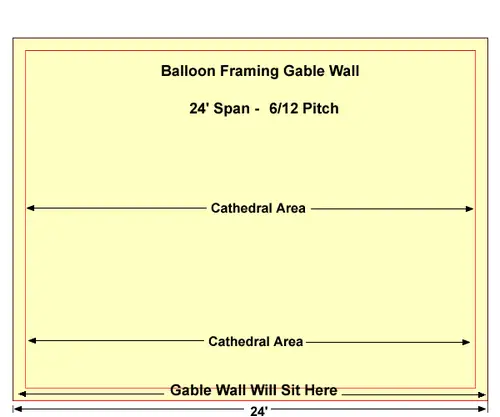
Situation
We need to balloon frame a gable wall for a 24 foot wide room with a
standard wall height of 8′. The roof pitch is 6/12, 2 x 10 common
rafters, and a rafter stand of 8 inches.
Lay Out Procedure
1. Snap exterior wall lines, including the two standard wall’s that will tie into the balloon framed wall.
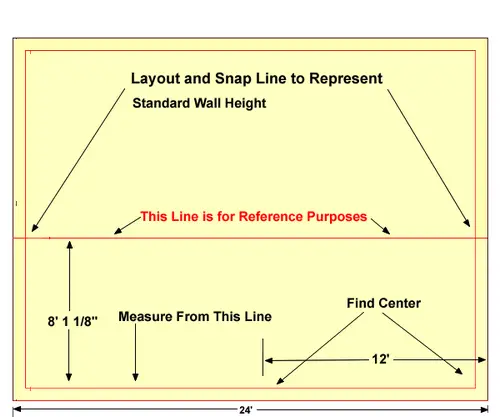
2.
Snap line at standard wall height, measure from the inside of where the
gable wall will sit and place line parallel to bottom of wall. For an
8′ wall this is actually 8′ 1 1/8″
3. Find center of bottom of wall, 24′ divided by 2 = 12′.
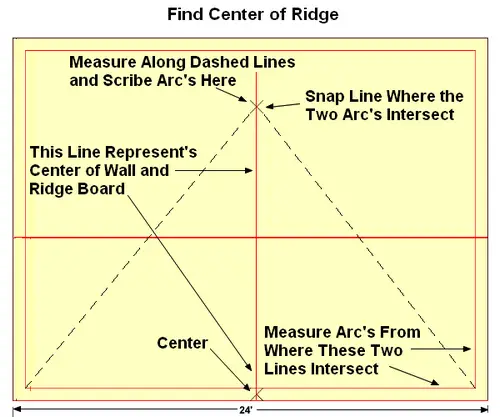
4.
Locate center of ridge board, measuring from inside corner’s of layout
lines for gable and standard wall’s scribe an arc with tape measure and
pencil. It really doesn’t matter what measurement you use to scribe
these arc’s, as long as you use the same number for both sides. Take an
educated guess as to where you think the center will be and pick a
number, in this case I would go with 20 feet.
5.
Where these two arc’s intersect snap a chalk line to the center of the
bottom of the gable wall. This line will be used to represent the
center from bottom of wall to peak of roof.
6.
Determine stand of common rafter’s, keep in mind that the rafter,s for a
cathedral ceiling area are often larger framing members. This is to
allow for proper ventilation and insulation. Make the stand on these
rafter’s the same as what will be used in the majority of the building.
Ours shall be 8″.
7. Determine rise of common rafter’s, using the Construction Master calculator, 12′ run, 6″ pitch = 6′ rise.
8. Add rise and stand together, 6′ rise + 8″ stand = 6′ 8″ actual rise.
9.
Mark peak of roof, measuring from standard wall height reference line
and along center line mark 6′ 8″. This is the peak of the roof.
10. Mark stand of common rafter’s, measure 12′ out and 8″ up to mark the stand of the rafter’s. Lay out both sides.
11. Snap chalk lines from peak to stand, these lines represent the top of the rafter.
12. Place and tack down bottom and top plates inside chalk lines. Layout all stud’s, windows, and door’s from center line.

Finished Wall

Balloon Framing Tip’s
A diagram of the gable wall
should be created on the floor deck, if the arcs for center line are
properly done the wall will be square if all measurements are taken from
the center line
Only use standard wall height, center, and bottom
plate reference lines for balloon framing gable wall’s. Using the two
outside standard wall lines will screw you up if you’re not perfectly
square.
Keep in mind what method will be used for fly rafter’s.
Will you be using look-out’s, if so, will they be flat? Also stay down
at least a half an inch below where you need to be. It won’t matter if
the gable wall is an inch short, but we all know what’s involved if it’s
too tall.
Instead of measuring every stud it’s much easier to
just put them on the lay out marks and mark and cut in place. A single
top plate is all I ever use unless told different, just cut the studs
square at the short point, it will be nailed to the common rafter later
anyway.
All gable wall’s should be laid out from the center as
this will save on material. Gable trusses are always laid out from the
center and at least your studs will line up every 4 feet.
A Brief History of Balloon Framing
Balloon framing replaced the labor and skill intensive method of post
and beam construction with it’s skeleton held together by mortise and
tenon. Believed to have been first introduced in Chicago sometime in the
early 1830′.
This method of wood frame construction
greatly reduced the amount of skill and labor required by post and beam
construction. It made constructing homes and outbuildings more
affordable for the average American
of the time period. Balloon framing most certainly aided in the
westward expansion of America. The overnight boom town’s of the old west
were built this way.
Balloon framing got it’s name
from the old post and beam tradesmen. When they were first introduced to
this method they were convinced it would be blown away in the first
strong wind just like a balloon. With it’s long skinny framing member’s
and only held together with nails. The name stuck and has endured to
this day. It was replaced by a method called platform framing in the mid
1950’s. Platform framing is the most commonly used method to this day.
Links to Related Carpentry Pro Framer Pages
| Balloon Framing to Home Basic Wall Framing t |
Laying Out WallsSitemap |